Do-it-yourself paper fortress scheme. Tricky do-it-yourself locks
It is relatively simple, just with a little effort and a little patience, to make a beautiful lock out of paper, which will surely please not only a boy, but also a girl. It will be possible to take the scheme found on the Internet as a basis, but this does not mean that it is worth finishing work on this. It would be nice to turn on your imagination and create your own unique palace. Additionally, this product can be used as a decoration, for example, as a stand for various confectionery products.
What do you need to make a paper lock?
You will need a cardboard box, sand, paints, cloth, sawdust, as well as cans for chips, glue; scissors and a pen.

Advice
If you are doing this for the first time, it is advisable to use the step-by-step instructions with illustrations.

First, you should disassemble the box, leaving its bottom as the lower part of your future castle. It would be nice to draw a gate on one of the walls, then cut it out, leaving only the connection with the bottom of the box. Further, on the upper box you need to make teeth, then they need to be completely bent through one in order to further glue the cardboard roof on them. Then you can combine sand and paints. It is necessary to divide the sand into piles, and then combine them with yellow, red and blue paints. Before moving on to the next step, you will need to wait until the sand is completely dry. It is necessary to apply glue to the walls of the future castle and sprinkle them with yellow sand. As a facing for the front wall, several pieces are cut out of cardboard, which will visually resemble stones. They will need to be glued along the edge of the castle gate. After that, you need to take a can of chips and cut out a semblance of a window in it. And a cone is glued on top, which will serve as a roof. Glue is applied to the tower, and then blue sand is poured. Red sand is used to decorate the castle roof. The paper lock should be secured to the base. For this, cardboard is taken, which is then painted over in blue - it will be like a ditch with water around the cardboard structure. The grass, supposedly growing between the castle and the moat with water, is made on the basis of sawdust, painted over in a green shade. Now all that remains is to come up with some interesting and fascinating story to please the child with the story and give him a new game.

Making a believable, paper lock
In order for a cardboard lock, created at home, with your own hands, based on paper, to become the most accurate copy of your original, you need to adhere to several rules. First, you need to make towers. To do this, it is worth using tubes, at one end of which teeth are cut. This will become the top of the castle. They must necessarily be the same, and also be located at approximately the same distance from each other. To implement this, you must first outline everything with a ruler and a pencil, only then you can actually start cutting. It is also important not to forget to draw the windows and doors. First, sketch them out with a pencil.

Advice
You can decorate the towers as you like, at your own discretion.
Walls
After that, you can move on to the walls. You need to cut 4 templates. Each of them has a rectangular shape and an approximate height of 9 centimeters and a width of 7 centimeters. Castles have always been built of stones, so in order to make the cardboard structure as similar as possible to the prototype, you need to draw stones. To do this, you need to paint over 3 walls in gray paint, and then, after it dries, draw arbitrary stones using a felt-tip pen or marker. And on the last castle wall, you need to equip the gates, you first need to draw them, and then cut them out. They paint them under a tree, also, in order to make them more believable, you can draw hinges for them, on which the door leaves are held. The last wall will need to be connected to the rest.

Tower
Now it was the turn of the towers. Their circles are conventionally divided into 4 parts, after which, in 2 adjacent ones, it is necessary to make small cuts, in height, like the walls of a castle. Then connect each of them to the walls. The roof can be made on one or all towers. It depends on the creative idea. For the roof, you should take cardboard, from which you then cut a circle. After that, it is cut into 2 parts, on which you need to draw a semblance of a tile. Next, the roof is secured with a cardboard lock.

Output:
Making a palace out of paper or cardboard is not as difficult as it might seem. Moreover, using the step-by-step instructions, you will save yourself from mistakes. Such a craft will arouse the child's interest for a long time and will become one of his favorite toys.
How to make a paper lock
Cardboard lock
Paper lock
For the resourceful and creative, nothing is impossible, right? Why spend your personal savings on an expensive construction set, if it can be made from junk material ... and in just half an hour! Do not believe? Then watch how easily cardboard rolls, trays and boxes turn into luxury. medieval castle, and you will want to do such a miracle yourself.
But the most interesting thing is that each time the fortress can be built in a different way - depending on the mood and circumstances of the game.
Please prepare:
- rolls of paper towels, foil, etc.,
- cardboard boxes and inserts,
- egg tray,
- cones, nuts,
- toothpicks,
- scissors,
- stationery knife,
- PVA glue (glue gun),
- stapler.
Get started and don't be afraid to fantasize, the main thing is passion and love for nature! Recycling of raw materials - another step towards preserving the natural resources of the Earth.
At first let's make a dragon... Such a cute dinosaur will perfectly cope with his role. Cut out the silhouette of a dinosaur from the cardboard part. Cut the tea towel roll in half and make two longitudinal cuts on both halves. These are the limbs of a dinosaur. Glue gray spots on the dragon's back, and on top - colored ribbed spikes. There is very little left - to make the eyes of the dinosaur, draw a mouth and fix the body in the incisions of the cardboard rolls. Ready!

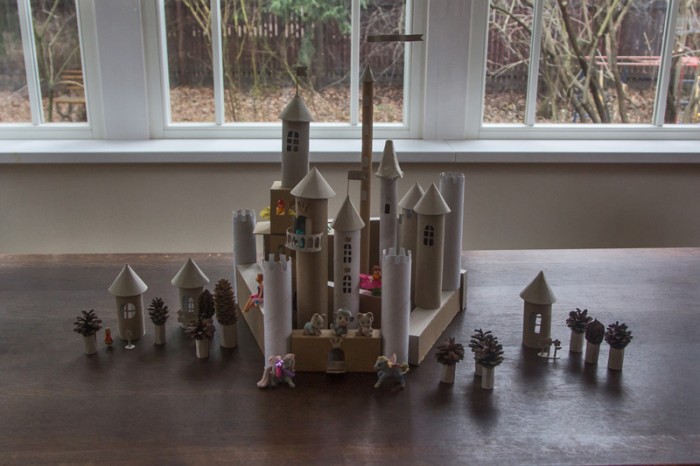
Moving on to making a paper lock... The courtyard towers will consist of rolls of various diameters and heights. Cut out windows and balconies with a clerical knife or nail scissors. It is better to entrust mom or dad to cut the rolls.
Trees are easily made by hot glue the nuts and cones inside small cardboard cylinders.


Feel free to glue a cardboard base to the narrowest and highest towers - a circle or a coil of decorative tape. Otherwise, the rolls will fall and destroy the structure.
The roofs of the fairytale castle are very easy to make! Lubricate the inside of the cut out egg-box and attach to the tower. The sharp tops of the towers are easy to make from cardboard circles. One has only to cut out a small sector with the top in the center of the circle, roll the workpiece into a cone and fasten it with a stapler or PVA glue.
Make the walls and corridors of the palace from cardboard parts from the packaging of household appliances. They should resemble brick in shape.

The pride of each castle is its flag. Multi-colored flags (if, of course, You paint them) will decorate Your fortress on attachments made of toothpicks.
What is a palace without a princess? They put her in one of the towers of the fortress. And don't forget about the courtiers, guards and other puppet people.

Add details: cut out the image of the crown - a symbol of royalty, make flower beds and an entrance to the fortress with a drawbridge.

Pull the old railway out of the closet - and you already have a whole fabulous country with amazing inhabitants and medieval architecture. An addicting game!

And having played enough, do not forget to assemble the constructor in a box or plastic container. The fairytale castle will come in handy for you more than once.
To protect the house from the penetration of strangers, locks are installed on the doors. They come in different types and types, so choosing the model of interest, taking into account your requirements, will not be difficult.
Classification of door locks
By the degree of protection and by the opening mechanism, the locks can be divided into the following groups:
- constipation - hook, latch, etc.;
- locks - mechanical, electromechanical, electromagnetic.
A simple option for the unlocking method is constipation. They do not contain a secret locking mechanism and no keys are used to unlock.
Of the locks with a mechanism, a simple option is mechanical devices. To open or close them, you need a key, which is inserted into the well and, depending on the design, is either turned or moved back and forth. As a result, the lock is triggered and the door opens.
An electrical signal is used to control electromechanical and electromagnetic devices. They allow the use of a remote control to open the system remotely. It can use fingerprint or palm reader, voice control, etc.
According to the mounting option, locks are:
- waybills,
- mortise / built-in,
- hinged.
Overheads are less practical, so their use is gradually fading away. The lock consists of two important elements: on one side there is a secret mechanism and a latch, on the other side - a strike plate.
Mortise door devices are more practical and popular. When fastened, the main part is located in the body of the door. From the outside, only the keyhole, decorative panel and handle for opening the door are visible. The counterpart is located in the same way in the door frame.
The built-in lock is more practical. It is also located inside the door leaf, but with the only difference that it does not cut into it, but is installed during the manufacture of the door. A distinctive feature of such devices is the presence of crossbars, which can be located not only in the area of the lock, but also around the entire perimeter of the door.
The padlock is used only for locking outbuildings. Because its use on entrance or interior doors is impractical.
Almost any lock contains the same set of elements:
- castle larvae;
- retractable crossbars;
- pens;
- fallopian uvula;
- overhead panel.
A distinctive feature of locks for interior doors is the absence of a secret mechanism, while door devices for entrance blocks cannot do without them. The more lock combinations, the more reliable the locking device.
There are certain types of door structures that are classified as burglar-proof. It is impossible to open such a lock without your own key.
By the type of locking mechanism, door devices are divided into lever and cylinder.
Locks can either be purchased in specialized stores or on the construction market, or made on the door with your own hands. For such a constipation, it is much more difficult to find a key, it is assembled from high-quality elements, and only the developer knows the scheme of the secret part.
In addition, locks are divided according to the area of application, in connection with which they are:
- for entrance doors;
- for interior doors.
Their device is about the same, but there are still differences, which allows you to differentiate the devices by purpose.
Securing mechanism
The larva is the main part of the castle. The safety of personal property depends on its reliability and secrecy.
Depending on the design, the larvae are:
- cylinder;
- levers;
- disk;
- crossbar;
- cross.
For cylinder devices, the location of the secret mechanism in a kind of cylinder is characteristic. It consists of several pins that are responsible for opening and closing the lock. In order to unlock such a device, a key is needed, with special notches, which, when the key is turned, will mix the pins into a certain position.
Leveled types are considered more reliable. This is due to the presence of special levers, which rise to a certain level when the key moves in the keyhole.
The disk device is less reliable, but not less popular. To unlock such a mechanism, you need a key, in the form of a rod cut in half, with characteristic notches. When turning such a key inside the keyhole, a kind of tunnel is formed and the discs turn, as a result of which the mechanism is unlocked.
Crossbars are less reliable, so they are rarely used. The unlocking principle consists in the movement of two crossbars, which are pulled from each other with special keys.
The cruciform larva is the most unreliable. You can pick this type of lock with a Phillips screwdriver at your disposal.
Homemade latch lock
The principle of operation is as follows: a bolt (such as furniture) is installed in the door, which is turned with a hex key. The bolt runs through the entire thickness of the blade. On the back side of the sash there is a lath (latch) that is attached to the bolt. For this, a flat flat is made at the end of the hardware. It is performed using a file. The rail is pushed onto the flat. To prevent the steel plate from falling off the bolt, support it with a nut, which is screwed on one side and the other of the latch.
To lock the door, the latch must be in the striker.
Now, to open the door, insert a hex wrench into the head of the bolt and turn. Simultaneously with the rotation of the bolt, the latch also turns.
 Concealed mechanical device
 The trick of such a latch is that it is difficult to find the head of the unlocking bolt on the surface of the blade.
DIY mechanical lock
Such a valve can be made by hand. It is a metal plate that looks like in the figure.
A small hole is made in the sash (about 10 mm). The key shaft at the end has a plate that can rotate around its axis. When the key is pushed into the keyhole, the plate with the shank forms a single straight line. A stop is marked on the rod, and the key is inserted into the well clearly along this stop. Further, the plate is lowered under its own weight and fixed in one of the slots on the valve.
 Diagram of a homemade mechanical device
 To prevent the rail from falling out during movement, a limiter or stopper is installed for it, made in the form of a stop and two supporting brackets. Thus, on the one hand, the rail travel is controlled by the stop - limiter, on the other, it moves to the first bracket.
Such a system can only be opened by its own key, made for this lock, since from the outside it is impossible to find out the length of the plate attached to the rod.
Electromechanical door device
When the door is locked, the bolt, consisting of a rod and a head, enters the counter bar, while the spring associated with it is stretched or cocked. The spring is connected to a coil or solenoid. In the event of a power outage, the spring is released and the bolt is pulled into the lock.
 Electromechanical device design
 Attention! If there is no electricity, then the lock can be opened from the outside with a key, and from the inside the door is opened using a special lever or button.
Electromagnetic door locks
To understand how to make a magnetic lock with your own hands, first consider its device.
The lock and its structure
The main element of the mechanism is an electromagnet, which is a core made of transformer steel in the shape of the letter Ш. Such steel does not have a memory effect and is a soft magnetic material. The core is assembled from a large number of thin plates or made from a solid plate.
Enamelled copper wire winding around the core. The coil has a large number (up to a thousand or more) turns. When an electric current passes through the winding, an electromagnetic field is created in the core, which controls the operation of the lock.
However, over time, the mechanical characteristics of the door weaken due to the effect of remanence. To combat it, the effect of voltage polarity reversal when demagnetizing the lock device is used. However, in this case, force is required to open the door.
Due to the absence of moving parts, the lock has a long service life.
Since low-alloy steel is used for the manufacture of parts of the lock, which is easily corroded, they must be protected. For protection, varnishing, zinc or nickel plating are used.
The main parameter of the lock is the holding force of the door. To increase the force that is used to hold the door, it is possible to install several locks. This value depends on the material from which the core and armature are made, the current strength and the number of turns in the coil winding. They are carried out overhead type.
Electromagnetic or electromechanical locks are installed on fire doors, entrance structures in entrances, etc.
Types of electromagnetic locks
Depending on the work of the anchor, structures are divided into retention and shear. In restraining models, the anchor acts on the separation, and in the shear model, it moves in the transverse direction.
For retaining locks, when voltage is applied, the arising magnetic field in the armature-core circuit keeps the sash from opening.
 The operating principle of the holding electromagnetic lock
 For shear-type devices, the armature has holes, and the core has protrusions for these holes. When voltage is applied, the armature is brought to the core and attracted to it. In this case, the protrusions of the magnetic circuit enter the corresponding grooves of the armature. In this case, the holding force is characterized by the force that must be applied to move the armature and the design features of the protrusions and holes.
Sliding locks are installed using a cut-in at the end of the curtain and, thanks to this, this type allows you to install a secret magnetic bolt on the front door.
We assemble an electromagnetic lock with our own hands
Let's consider one of the options for assembling the mechanism.
To assemble an electromagnetic lock using your experience, which would be opened with a remote control, you must:
- Push-button flush-mounted panel.
- Power Supply.
- Electromagnetic relays. If we are going to open it with a four-digit code, then we use at least 5 relays.
- The castle itself.
- Button for opening the door from the inside.
- Reed switch and electromagnet.
 Electromagnetic lock diagram
A keypad such as the KBD-10V model can be purchased on the market.
Thus, you can assemble a lock of any type with your own hands. And it is important not only to build and decorate a house or garage beautifully, but also to protect it from unwanted visitors with a reliable lock.
In contact with
Comments (1)
Unfortunately, there are no comments or reviews yet, but you can leave your ...
New articles
New comments
ArtemGrade
HelenaGrade
nezabudka-1Grade
CatherineGrade
VladimirI propose to see the original decorative locks that Eleksys made on their own garden plot with their own hands.
The first flowerbed castle was made about eight years ago. The rest is recent - last year and the year before last. The real beacon glows at night.


And here are some other crafts for the garden you can make from plaster with your own hands.


And now a master class!
I had a fix idea to make a handicraft for the garden, entertaining the eye, with my own hands. The choice fell on a mini-castle, since it is easiest to inscribe it at any point of the site, taking into account its geological features. Moreover, you can build creatively by adding or changing its elements on the go.

The main material is sand and cement for the longevity of the composition. After some experimentation, I settled on a 2 to 1 ratio (i.e. 2 parts sand and 1 part cement). It is better to dry the sand in the sun, then it is easier to mix it with cement, as well as sift it for use in elements with fine detail, since debris can ruin the part.
The castle has a fairly decent volume, therefore it is unrealistic to build it all at once. To do this, first I make separate parts of the castle, so that later, like from cubes, I build it in a couple of days. The last, third castle was assembled in two days. The neighbors thought he fell from the sky when they saw him.
So, let's consider the elements of a typical design.

Let's start with the turrets. A cylinder of the required radius is rolled up from a sheet of iron (mine is about 2-30 cm). The cylinder is fixed with wire or self-tapping screws so that it can be easily disassembled later. Anything is put inside the cylinder - bottles, cans - to reduce the consumption of the solution, but the thickness to the ballast should be at least 5 cm. Fill with a sufficiently thick solution. We give it a few hours to set to such a state that when removing the formwork, it does not crumble. You can choose the height of the cylindrical formwork yourself. It can be equal to the height of the tower, or less, but then the formwork will have to be disassembled and assembled above the already set lower part.

We immediately begin to cut the raw, slightly set solution. Cutting technology is the same as that of sandpitters. For cutting, I use a set of tools available to everyone. I have screwdrivers, chisels, a medical scalpel, a hacksaw blade for metal and various strips of tin to form various architectural elements.
A simple cylinder is boring, and this is where the flight of imagination begins. I make various grooves by wrapping a cylinder with a long strip of sheet metal, using this strip as a guide, select the ring grooves with a screwdriver or chisel. Then, in the lower part, you can imitate masonry, destruction, plaster chips, cracks - after all, the castle is ancient.

For me, aging is the most exciting part of the process. At the same time, we do not amuse to make windows, loopholes, picking out the necessary recess with a knife. If there is a desire to make a turret in the upper part of the tower, then we roll up a cylinder with a diameter of a couple of centimeters larger and a height of 10-15 cm, insert a plastic bottle inside to save the solution (it will be removed after complete setting).

Fill the form with mortar and after partial setting, carefully remove the formwork cylinder and make the required number of windows, teeth - as your imagination tells you. I cut the teeth with a hacksaw blade for metal - I make the cuts of the required depth and pick out the excess solution between the cuts.

The roof can be made from tin cones, and you can use this tin cone as a mold for pouring mortar (which is exactly what I do). After complete setting, carefully knock our roof out of the mold. Do not forget that we are still preparing individual elements of the castle. We will put everything together later. So we sorted out the tower. All the elements are ready and stacked somewhere in the corner.

Let's start building the walls. Our walls will be either fortifications (1) or an element of the building (2).

There is no difference in their manufacture. We collect the required rectangle from 5 cm wide boards. We put it on a flat surface (I have an old kitchen table), having previously placed either a film or a piece of roofing material, so that the solution poured over then is not absorbed. You can place a metal arch in this frame - it will be a door or a gate. Pour the solution into the frame. Where no window or door is planned, gravel or broken brick can be poured into the bottom to save mortar. After the mortar is poured to the desired height, you can take pretty pebbles from the rubble and stick them into the base of the foundation so that they protrude about 5 mm above the general plane of the mortar with flat edges.
If there is no gravel, then after partial setting with a sharp knife or scalpel, you can simulate the foundation. You can also designate future windows with pebbles. Thus, your task is to make such flat elements. To speed up, I make 2-3 such rectangles at the same time. Having made such a wall once, you will understand that they are made easily and very quickly. As a rule, we are interested in the outer side of the castle, the inner part does not represent anything, because it is not visible.

So the solution of our future walls in a few hours grabbed very (!) This moment, so that it was pliable, but not destroyed, and if overexposed it would be difficult to give in to processing. We carefully disassemble the frame and we have a flat rectangle on the table. If you make a wall with teeth, then we make the gaps between the teeth by gradually removing the mortar with a flat tool (I use a metal ruler for this). Then loopholes and windows are made. Draw whatever your fantasy tells you. To remove the remains of the solution, I use a soft brush (probably seen in the movies how archaeologists work). In the end, something like the following will remain on your table.

Leave the finished walls on the table for about a day. Then they can be safely removed from the table and also placed in a corner. When the required number of elements has already been done, we choose a sunny day for installation in a summer cottage. Here is another important moment. The castle looks more beautiful on some kind of dais, on a heap of stones. So prepare the foundation for it. When using stones, always place the stones on a small layer of mortar first. If you don't, the stones will move over time and destroy your beauty.
When the foundation is ready, we proceed to the assembly. First, we install it on a cement mortar previously applied to the foundation, for example, tower number 1. We attach wall # 1 to the mortar tower. Then we install tower number 2.

The castle is already beginning to take shape. Excitement grips you. Then you add wall number 2 and finish with the installation of tower number 3. My towers were heavy, so the men need to tinker. Thus, at this stage, we have got this design (top view)
But wall # 2 will be part of the building, so I take some bricks and form a rectangle for this building. To prevent the solution from entering the windows or doors from the inside, I close them from the inside with something flat (I use pieces of flat slate or fragments of flat tiles).
I have the inside of the castle hidden. But if you want it to have a beautiful view, you need to make both wall No. 3 and the inner part for the monolith to pour concrete mortar or clog it up with construction waste.


When this structure takes hold, form a gable roof over the building. It takes me two or three bricks (the mortar is poured with a spatula and leveled under the cone).
This is how from the basic basic elements, slightly changing them depending on the imagination (for example, you are tired of round towers - make a rectangular formwork and the towers will be square, etc.) you can make a complex castle, for example.


A castle made of just concrete is not very beautiful. We need to decorate it.


About imitation. The boulders at the base of the foundation are very easy to make as they are of arbitrary shape. Imitation brick requires more patience. Under the ruler, I scratch a series of horizontal lines and then make vertical notches at characteristic intervals. Brush off the debris. Where the surface is very rough, it can be smoothed by moistening with water from a spray and ironing with a soft brush. When the assembled lock is completely dry, you can tint it a little. Make the roof look like a tile. I use acrylic paint with the desired color scheme, for painting imitation bricks I purchased such colors for acrylic - black, red, brown, yellow. Green can be taken to simulate moss. I paint the surface with a soft brush, lightly touching the masonry with different colors of the color scheme. In this case, only the convex surface is painted, and the recessed part remains gray. The effect is amazing. From half a meter it seems that everything is made of small bricks. In one place in the castle, I even imitated a destroyed brick wall. I myself did not expect such an effect. For a year the castle has survived the winter and the colors are like new.
Can parts of the house be made? I work in a garage. But in principle, you can also at home if you do not litter much. In this case, the details can be broken down into even smaller ones. Those. for example, make a wall in two parts - the upper one where the battlements and the lower one where the gate. Likewise, make a tower from two or three cylinders or cubes. Then it is easier to transport. This allows you to cook the castle even in winter and spring, and in the summer to assemble it in a couple of days. I prepare the dry mixture like this. I fill half a bucket with dry sand, add cement and it mixes very easily with a small child's spatula. I pour all this into a small tub and make the next batch until I fill it. Thus, the dry solution is always in sufficient quantity.
I wish you all success in your work. And be sure to share your results.
Maybe, out of the blue, you have some free evening time, and you want to spend it with your child. Maybe you just love to create unusual and original things with your own hands. In any case, we suggest you learn how to make a cardboard lock quickly and easily with your own hands.
How to build an original cardboard lock with your own hands: preparation for the process
To make an original and unique cardboard structure, you first need to prepare the starting materials. To build the walls and towers of your home, you need to find large sheets of thick cardboard. As a building material for the phased formation of walls, old cardboard boxes are suitable for you. These boxes can be assembled after purchasing household appliances or new furniture.
Cut out windows and at least one door on the surface of your cardboard box. Now you need to find boxes from small TVs, or just small boxes, from which you will build turrets, otherwise what kind of castle is it.
You can make a balcony for a tiny doll using chicken egg packaging. Such a template is easy to fix on a thick cardboard wall.

You can form tiles on the roofs of your castle turrets from colorful stationery. You can do the interior design of the building completely at your discretion.
Making models and diagrams is a very important component of children's creativity. After assembling the model, the child not only develops his imagination, spatial thinking, fine motor skills of his hands, but also a detailed, accurate idea of the subject. We offer our readers detailed information and a master class on the process of making a model of the castle.

To work, you will need to prepare the following materials and tools:
- thick cardboard;
- PVA glue;
- ruler;
- simple pencil;
- compass;
- sharp scissors;
- watercolor paints.
Now proceed to the process of making a model for your structure. If you and your child decide to make a model of the royal castle, then first decide on the material for creativity. You can use wood panels or cardboard sheets as a building material.
If you opt for a wooden material, then you will get a solid, durable royal castle - a real reason to be proud. The main disadvantage of a wooden lock is the difficulty in cutting out parts from a sheet of wood. However, if you are good at a jigsaw, then this will not be particularly difficult for you.

Making your own cardboard lock seems to be very easy and simple. The process of cutting and gluing separate parts of the composition with each other looks very easy and simple to perform. However, difficulties can arise when any part of the structure is not completely glued. In this case, it is necessary to add a small amount of PVA glue. As a result of such actions, a few drops of glue can get on the front "wall" of the castle, because of this, paint stains on it, and so on. It is also quite difficult to maintain the flawless appearance of a product made of such a fragile paper material.
Having decided on the desired material, start making the drawings of your design. Decide on the design of the castle that you want to bring to life. When using sheets of cardboard as a starting material, you can make locks of any complexity. These can be buildings with rounded walls and turrets, carved windows or drawbridges. Cardboard is a very flexible material, so your imagination is not limited in this case.
At the moment when you already have a finished idea, draw a sketch of the future structure. Then write the approximate height, length and width of your castle right on your template. Based on the basic dimensions, start building a more detailed and detailed drawing. Use a compass to build the rounded parts of your structure.

After that, transfer the drawing to the selected material. Paint all the fragments of the building in the chosen color. After complete drying, cut out all the details along the contour and glue. Now your original and unique castle is ready.
Related videos
We offer a selection of videos on the topic of the article. In the presented material, you will find a visual demonstration of the process of making a cardboard lock. Enjoy viewing and exploring!

