Marker float for feeder. How to make a Kinder float Kinder Surprise float
Homemade carp fishing floats it's not difficult to do. We will show you how you can make a do-it-yourself float from almost any available means.
You will learn how to measure for what rig in grams, your float will be calculated. And according to tradition, of course, a video selection of making homemade floats for fishing.
Most likely, you will be very surprised and pleasantly surprised to find out how many different small things from everyday life are suitable for homemade floats for catching crucian carp.
Let's get started ...
Homemade floats for catching crucian carp with VIDEO. Content
- Homemade cork float
- Homemade tube float
- Homemade marker float
- Homemade float from the handle
- Homemade feather float
- Homemade heat shrink float
The first homemade float for catching crucian carp will be made from a regular wine or champagne cork.
If you are not able to watch the video, we will describe how to do it ...
- You can make two holes, at the top and bottom. And insert two sticks. Or you can make a hole through and through.
- Take a wooden cork and make a hole through it. This can be done with a hot nail, small drill, or corkscrew.
- Insert the base of the float into this hole. This can be a chupa chups stick, a wooden stick (sold in supermarkets), ear sticks.
- After that, insert the stick into the drill and grind the cork with sandpaper. If you have not made a through hole, then simply sand with your hands.
- The last step is to make a ring. A ring can be made from a fitting needle (as in the photo), or from a piece of a small paper clip (oval at the top or bottom) cut off and wound with electrical tape to the stick.
- Aesthetic beauty can be done very simply. Paint the float in any colors and varnish (if desired). Always make the bottom of the float in the water black.
And here is the video itself ...
Homemade float for catching crucian carp from a tube video

What kind of tube are you referring to? This is a drinking straw and a flag tube. The float is done in almost a couple of minutes.
- Heat one of the ends of the tube under fire and twist it.
- Heat the other end and twist a little more of the tube, after twisting, press it with pliers. Make a flat area for the ringlet.
- Next, burn a hole with a heated needle, in the platform that you made with pliers.
- Throw a ring that can be made from a wire or from a fitting needle and that's it.
- The final touch is beauty. Grind the upper end gently with sandpaper and paint with markers or wrap with multi-colored tape.
Step-by-step instructions for a float from a tube for catching crucian carp with your own hands video:
And here's how to do loaded homemade float for fishing including crucian carp from a tube video …

Another great video on how to make a float with your own hands from almost everything that is at hand: a marker, a pen, a feather (goose, chicken, duck, turkey).
To do this, you only need the starting material, wire or a fitting needle and fire. ALL …

This method of making a homemade float for fishing carp from heat shrinkage, it is better to watch the video:
Also, do-it-yourself floats can be made from a kinder surprise, any plastic stick, cone, syringe, etc.
All that is needed for the most part: a wire for a ringlet, fire and multi-colored markers for painting, and of course a little creativity.
After all, as if now it was not easy to buy any float for a penny, but made with your own hands - this is a special feeling. Those who understand this appreciate it!
Successful fishing - dear ones!
Any fisherman who is serious about fishing always has a marker float. It is needed to mark the place of fishing, to make accurate casts, especially when fishing with a feeder. This float is installed in places where fish are baited or in places where there are significant differences in depths. In other words, using a marker float, you can mark a promising place on the pond.
But its functions do not end there. With the help of a marker float, it is possible to determine the bottom topography, as well as its character: sandy, rocky, hard or silty. You can buy it, or you can do it yourself at home.

It can be made from scrap materials or unnecessary items that can be easily found in the garage or in the workshop of any fishing enthusiast. To do this, you can use the following improvised parts:
- Used syringe.
- Marker.
- Plastic tube from a drill or drill.
- Plastic keg, from under the "Kinder Surprise".
- Another suitable item with positive buoyancy.
The manufacturing technology is the same, regardless of what item or material is used. This is due to the fact that they have the same purpose. It is enough to study the process of making such a float using any one object and it can then be made from any other object or material.
As a basis, you can take a tube from a drill, in which there are two plugs, one of which has a ring for fastening. If the design of the ring is not satisfactory, then the plastic ring can be cut off, and a carabiner can be installed in its place. On the other side of the tube, you need to install a stabilizer in the form of a dart plumage. By the way, it is precisely such a plumage that is suitable in this case. If the float is assembled correctly, then you can get the following sample:

If the manufacturing principle is clear, then you can safely start making a marker float from any other item.
You can also make an excellent marker float from an unnecessary syringe, and it is much easier to make it than from a drill tube. In order not to waste time on the description of its manufacture once again, it is better to watch the corresponding video. As they say, it is better to see once than to read a hundred times, especially since an experienced fisherman talks about this, sharpening his story on the intricacies of its manufacture.
Video "How to make a marker float from a syringe"
To install a marker float, first a sliding load weighing from 50 to 100 g is put on the line. The weight of the load depends on the nature of the reservoir and the presence of a current. The weight must be such that the float cannot hold it in the water column. The float itself is attached directly to the edge of the fishing line.
The float also acts as a stopper, preventing the load from flying off the line. And now, the most important thing is how such a tackle is used.
How to use a marker float
First, you need to decide on the purpose of the marker float, as well as on the functions performed. And they can be as follows:
- A marker float will help you not to lose a promising place or a place where the bait was thrown in the water area of the reservoir.
- Find out how deep the reservoir is in a particular place.
- Decide on the nature of the bottom of the reservoir.
As a rule, the marker float is cast using a conventional rod or brought by boat to the desired distance along with the bait. It is very important that the bait is delivered to the fishing point with a certain precision, and not spread over a large area. This is where the marker float will help, which will be there as a guideline where you should throw the portions of bait. Thus, a dotted spot of bait will be formed, which will make fishing more effective.
The depth of the reservoir is determined as follows: a marker float is thrown, during the throw it will be in the immediate vicinity of the load. Getting into the water, the load will begin to sink down. When the load sinks to the bottom, and you can always feel this, you need to start releasing the line so that the float floats to the surface of the water. The amount of line that has been drained will mean the depth of the reservoir, in the place where the cargo is located. Naturally, before releasing the line, you need to remember how many rings of the line are gone. You can do it differently: after the float appears on the surface of the water, start winding the line until the float drops to the load. In this case, you also need to calculate how many revolutions the coil has made.
With the help of this float, you can find holes, as well as depth differences, curbs and rifts. As far as is known, large fish are found in such areas of the reservoir that can be safely called promising.
Such a float, or rather a tackle, will help determine the nature of the bottom. To do this, the load is simply dragged along the bottom. If the bottom is solid and clean, then the load will pass without much resistance, and if the bottom is muddy, then the load will get stuck in the silt, and you will have to pull it with a certain effort. If the bottom is rocky, then a kind of tapping on the stones will be traced, and the load itself will move in jerks. Naturally, in order to learn how to use a weight to determine the nature of the bottom, it will take a lot of training, because this is a delicate matter.

A marker float, with a certain approach to the fishing itself, can be an indispensable thing, especially when traveling to unfamiliar waters. Yes, you will have to spend a lot of precious time on manipulations, but the result will not be long in coming.
Experienced anglers are well aware that when you go fishing, you should immediately start looking for a promising place. Just like that and anywhere, you can't catch fish on the pond. Therefore, the search for curbs, holes, rifts is the primary task of an angler who arrives at an unfamiliar body of water. Well, if you have a boat and an echo sounder, then the task is simplified and very much. And if fishing is carried out from the shore, then you should always take a marker float and a powerful rod.
Simple water-filled float
Simple water-filled float
For casting light baits, all kinds of floats are often used, which in different regions have a different name ("balda", "sbirulino", etc.). Often used for these purposes are spherical or egg-shaped water-filled floats, the weight of which is determined by the amount of water poured into them. These floats have positive buoyancy and, as a rule, require additional loading to guide the bait in the water column. A simple water-filled float with the ability to change its buoyancy from slowly sinking to floating is easy to make at home from scrap materials.
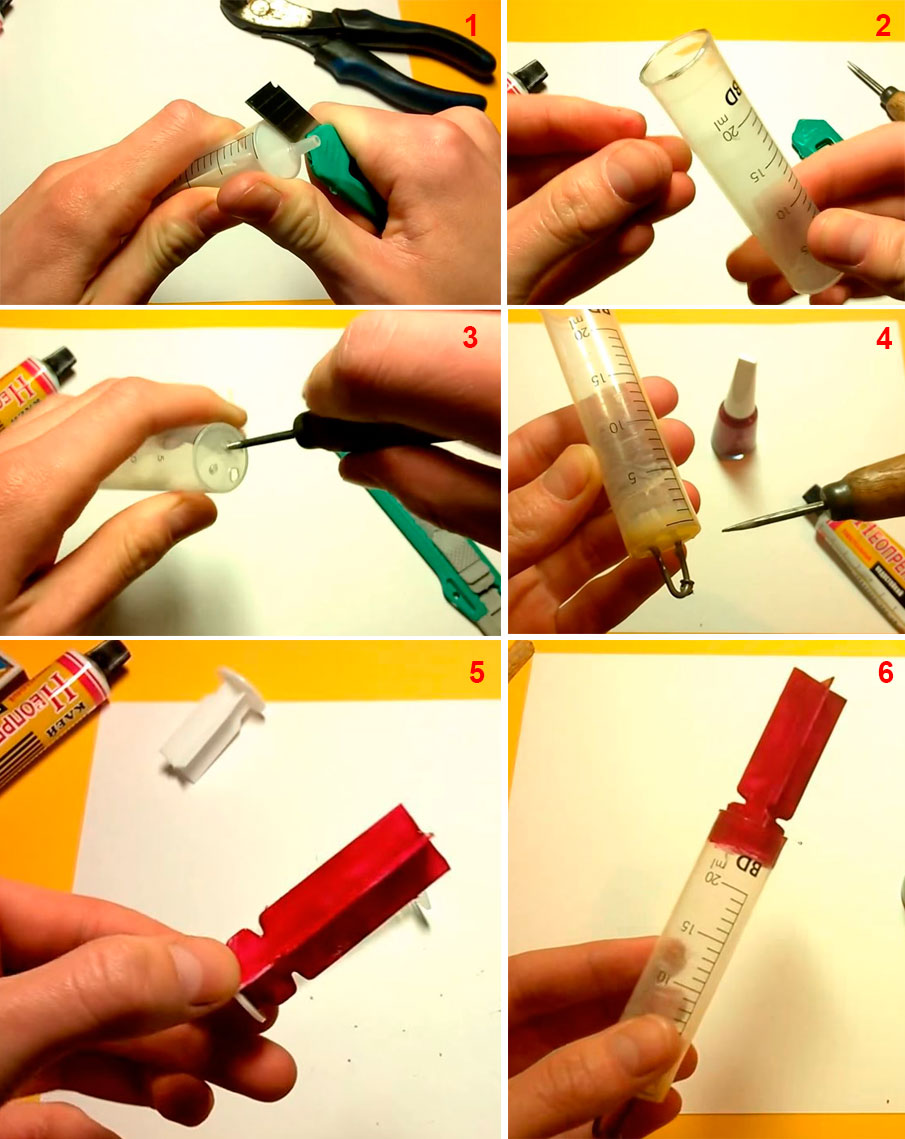
To make a float, we need a container from Kinder Surprise, a plastic straw stick from Chupa Chups and a ball lead sinker (Photo 1).
Materials for making a float.
On the fire of a lighter, we melt one end of the plastic tube until a rim is formed, and in the halves of the container we punch holes with a diameter slightly smaller than the diameter of the tube (Photo 2).

Preparing for assembly of the float.
We slightly flatten the lead weight and drill it in the center to be able to put it on the tube. Let's start assembling the float (Photo 3). We put on the half of the container on the tube, and then the lead weight and push it tightly until it stops in the tube. We put the second half of the container on the tube and melt the second end of the tube. The water-filled float is ready (Photo 4).

Assembling the float.
During operation, water is poured into the container, depending on the amount of which the float can be adjusted to the required buoyancy in a particular case (floating, neutral, slowly sinking, etc.).

Ready-made water-filled floats.
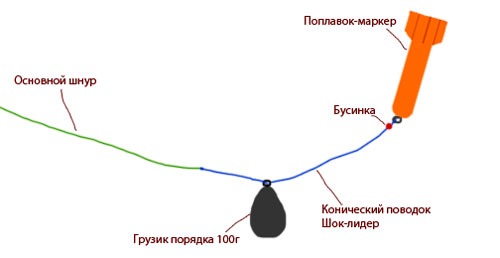
A version of the rig for fishing using a water-filled float is shown in Fig. 1. A stopper knot is knitted on the main line and a bead stopper is put on. An additional rubber washer can be placed between the bead and the knot. Next, a water-filled float is put on, a second bead stopper and a winding ring is tied. One or two leashes with lures are tied to the winding ring. To obtain the desired buoyancy, the float container is opened and partially filled with water. The required buoyancy is selected experimentally by the amount of water poured into the container. The container is closed and the tackle is ready for use.
A marker float is a tackle that allows you to analyze the underwater bottom topography and make sure that you have chosen the right fishing spot, find flat areas or holes that you can feed and try to catch fish with a feeder or a float.
- You will need: ↓
- Where to get a marker float: buy it or make it yourself? ↓
- Making a marker float with your own hands ↓
- Making the tackle ↓
- We equip the rod: ↓
- Now we assemble the rig itself with a marker float: ↓
- Technique for measuring depth with a marker float ↓
- Determination of the nature of the bottom soil using a marker float ↓
- Marker Float Video Tutorial ↓
In order to find a suitable place for fishing, you will need to devote some amount of time to measuring depths and relief using a marker float. You will find out what is the depth at each specific point in the reservoir and the nature of the soil: weeds, gravel, silt, shells.
Experience will come with practice and for an angler who has not used a marker float for the first time - it will be much easier and faster to do all the necessary procedures, but nothing complicated in the equipment that will be discussed - no, and we will prove it!
You will need:
- Powerful spinning rod with dough from 30 g
- Spinning reel containing 100 m of line 0.25.
- Line from 0.25 with a length of at least 100 meters.
- Sinker 25-40 g
- Marker float
Where to get a marker float: buy it or make it yourself?
 A marker float is not the best method for determining your fishing point. Why did he give in to wireless "
The first 4 listed components of the tackle are not difficult to find, but the marker float will either need to be made by hand or bought.
You can buy a marker float at any fishing store. If you fish in stagnant water, you don't have to bother with the shape and size of the float. A 30 g float will be just right. But for fishing on the current, a marker float is much more difficult to use. In a strong current, the probability that you will be able to measure the depth correctly is very low. It is necessary to use heavy weights (from 70-100 g) and high-capacity floats, their shape should be spherical (barrel-shaped).
Making a marker float with your own hands
 Syringe marker float (with rear fin and swivel as an ear in the front)
A piece of Styrofoam is the simplest version of a marker float. The rounder it is, the better, because nobody canceled the aerodynamic properties and it is important for us that the float in the water and on the water surface receives as little resistance as possible from the water flow.
A syringe marker float is also a good option and it is very easy to attach the float. One of the designs - a swivel is glued into the tip (we get an eyelet for tying the float to the tackle), and at the back we make a bright plumage from a dart, or we simply paint the back of the syringe in a bright color.
Wood float - similar to styrofoam - you can carve a float out of a piece of wood.
 A plastic egg from under Kinder Surprise is a very good float
Kinder Surprise marker float. A yellow plastic testicle is perfect as a float-buoy, but due to the very large carrying capacity, you must either fill in water or load it with weights, otherwise your tackle will turn out to be too heavy and you cannot throw it with a standard spinning rod. The fishing line is attached to such a marker float very simply: a small object is tied to the fishing line, for example, a swivel or a hook or just a bead. This item is inserted into the egg and the egg is closed. The line is now firmly attached. But this is more like a "marching option". If you are preparing the tackle at home, then it is better to make a hole with a hot needle exactly in the center of the lower part of the egg - insert the fishing line there and only then tie the stopper.
How to increase your fish catch?
For 7 years of active hobby for fishing, I have found dozens of ways to improve the bite. Here are the most effective ones:
- Bite activator. This addition of their dry blood attracts fish the most in cold and warm water. Discussion of the bite activator "Dry Blooder".
- Increasing the sensitivity of the tackle. Read the appropriate manuals for your specific tackle type.
- Pheromone-based baits.
Making tackle
If we have all the components of the tackle with a marker float, you can start putting it all together.
We equip the rod:
- The reel is attached to the rod, then the line is wound.
- The line is threaded through all the rings of the rod
Now we assemble the rig itself with a marker float:
- We thread a sinker with a large eye into the fishing line. The eyelet should be free of burrs, not to injure the line. The lead should move easily and freely along the line.
- We attach a stopper 20 cm from the end of the line. The easiest way is to use a rubber or plastic bead, but you need to attach it very tightly, it should not move along the line. If there is no rubber stopper at hand, in extreme cases you can use a lead pellet, but it is much worse than a rubber bead, since it poorly absorbs the impact of the sinker, and also strongly deforms the fishing line.
- A marker float is attached to the end of the line with any reliable knot. Here's the tackle and ready.
 Remote lead design with a loose ring to ensure that the line moves smoothly and freely through the ring
Technique for measuring depth with a marker float
- Everything is very simple. In order to measure the entire water area from you to, for example, 100 meters in front of you, you must:
- Make a long-distance cast for 100 meters and do not brake the line, even after splashing down the tackle.
- Make sure the line is still able to come off your reel and wait for the float to emerge. If the float floats up, you can close the line layer and start winding gently.
- We need the float to go deep to the very bottom (to the load), as soon as you, when winding, feel that you are no longer pulling the float to the bottom, but move the load along the bottom - stop.
- We take in hand the fishing line coming out of your reel. We open the line manager and select the line from the reel 1 meter at a time. After each meter, we look to see if the float has surfaced. If you chose the line 5 times (5 meters) and the float has not yet surfaced, then the depth is more than 5 meters. We choose the 6th time and again wait for the emergence. Surfaced? This means the depth is slightly less than 6 meters.
Thus, you can deepen the float again, drag it 5-10 meters along the bottom and measure the depth again. As you can see, the marker float allows you to get a complete picture of the bottom topography.
Determination of the nature of the bottom soil using a marker float
To determine what the bottom of the reservoir consists of using a marker float, a special sinker with spikes will help you. It is more sensitive to irregularities and dragging it along the bottom - you will feel on your hand what signals the sinker is giving you.
- Soft drawing - silt or mud
- Blows - pebbles
- Grinding - shellfish shells
- Tension and sharp jerks of the sinker - ground algae
Marker Float Video Tutorial
The world champion in feeder fishing Alexey Fadeev demonstrates the capabilities of a marker rod for measuring depth and determining the nature of the bottom.
We will be glad to hear your experience of using a marker float, from what you made them or what brands of floats do you recommend to buy.
Winter float and winter fishing rod rig
Ice Fishing Float

 Winter floats
By mounting method:
By design:
- Double float;
- Winter float "Tablet";
- Float-flower.
 Pop-up float
  Flower float
Float petal and flower
- Winter equipment with a hook;
- Equipment with a jig;

Loading a winter float
Winter float rod
 "Filly" with a reel
 How to make a winter float
How to make a winter float:
Winter float - video
Winter video chronicle
Opinions and comments
1,140With usI like it
Balance
Predator fishing rods
Winter float - an element of the equipment of a winter float rod, which serves as a bite alarm instead of a gatehouse or a nod. The float is designed to visualize the bite and hold the rig with a jig or hook in the desired position at the bottom.
Ice Fishing Float
Ice fishing floats can be classified by design and the way the float is attached to the line.
Winter floats
By mounting method:
According to the method of attachment, winter floats are divided into removable and non-removable. The latter are now very rarely used, the line of a winter fishing rod passes through the body of the float. Such a float can only be replaced with all the equipment.
Removable floats are fixed to the line at one point using a cambric or PVC tube. The removable float is fixed by a plastic or metal pin (latch) made of wire located at the bottom of the float. The latch itself is not rigidly attached to the float, but loosely, in a loop into a loop.
By design:
- Classic cylindrical or round float;
- Cylindrical float beveled at the top;
- Double float;
- Winter float "Tablet";
- Drop-down float-petal;
- Float-flower.
The last two types of floats are not often used for winter fishing and can be classified as exotic.
Pop-up float Flower float
Float petal and flower
As we said, a petal winter float is a complicated design of a conventional float. The purpose of this complication is to better visualize the moment of bite.
The petal float consists of two halves of a conventional cylindrical float, each of which has a loop for connecting to the float retainer. After making such a float, it is required to adjust the correct opening of the float after surfacing.
The flower float is a spectacular, but more complex design, which, if desired, can also be made by hand. In the assortment of fishing shops, we have not seen such floats.
Fishing rod rig with float
The equipment of a winter float rod is the float itself, a jig or a hook with weights located on the line of a winter fishing rod. The rig is built based on the fishing conditions - depth and current. There are the following options for winter float equipment:
- Winter equipment with a hook;
- Equipment with a jig;
- Combined rig with a hook and a jig, with two jigs or hooks.
The main hook or jig is tied to the main line without any leads. An additional hook is tied above the main hook or jig with a leash. An additional jig is tied above the main one, as a rule, without a leash - directly to the main line (a garland or a steam locomotive). The jig can play the role of a sinker located above the hook.
The device for rigging a winter fishing rod is a creative business. Based on the basic options, you can create your own.
Winter float fishing line
Many sources advise you to put a monofilament line with a diameter of no thinner than 0.14 mm, in case large fish like large bream or crucian carp bite. A strange recommendation is to sacrifice the amount of bites and fish caught for the sake of the opportunity to bring out a random "large".
If we catch bream or other large fish purposefully, it makes sense to use a line with a diameter of 0.13 - 0.15 mm, and if we catch, for example, medium-sized roach or silver bream, a line of 0.1 - 0.12 mm will do. A line thicker than 0.14 mm is used if a really very large fish is caught.
You can always have in stock several winter fishing rods with lines of different diameters. Considering that anglers usually fish with two or more rods in holes drilled side by side, it is possible to carry out "A" "B" testing of the catchability of different rigs.
Loading a winter float
Unlike the summer one, the winter float does not have an antenna, since it does not need it, because on winter fishing, the bite is visualized from above, and not from the side.
In addition, the winter float is completely immersed in water to prevent it from freezing and freezing into the film of ice that quickly forms in the hole.
A winter float is immersed in water to a depth of 1 - 2 cm from the surface. The total weight of the weights and jigs should provide just such a load on the float. Fine adjustment of the weight of the winter float is carried out by selecting the weight of an additional mini-weight.
Winter float rod
"Filly" with a reel
A winter fishing rod for a float is a matter of personal preference, there are no special requirements for a winter fishing rod. Since fishing is carried out stationary, the rod must be able to be placed on the ice. It can be a fishing rod with stands or fishing rods of the "filly" type.
As for the coil, it can be built-in, open or closed. Many people fish with simple rods without a reel.
How to make a winter float
Making a winter float with your own hands is not difficult. You just need to have a desire, a little time and a hard foam with tools - a sharp knife, file or sandpaper. Making a winter fishing float is even easier than nodding right. If you do not have the necessary materials, you can modify the store float.
The process of making a winter float was well demonstrated by Dmitry Salapin in his video:
How to make a winter float:
- Cut off the blank of the future winter float from a piece of solid foam;
- Using a knife, we form a cylindrical shape of the float with a transition to a cone at the bottom;
- We make two loops from a single-core telephone wire, one of which is glued into the lower base of the float, and the other is suspended from it by the loop-into-loop method - this is the fastener, the float lock to the fishing line;
- We paint the float with a permanent marker, varnish or paint.
A cylindrical foam winter float that can be sealed by rolling it between two planks. At the same time, the surface of the float becomes smoother and smoother, the small pores of the foam are closed.
The upper part of the float is cut obliquely so that during the ascent bite, the float goes to the side - this way the bite is more noticeable.
Coloring the float is useful not only for better visualization of the bite, but also to make the float freeze less and more easily get rid of frozen ice.
Winter float - video
Watch a video in our selection on the topic of the winter float and its use in winter fishing. Fishing with a fishing rod with a float:
Floats for fishing on the current - what is their secret
Fishing with a float on the current is perhaps one of the most popular fishing methods. Many countries even host float competitions.
What the fisherman will face when using the float on the current:
- The float is constantly pulling downstream.
- The float floats at an acute angle to the surface of the water, making it difficult to observe.
- The instability of the float (similar to a bite) due to the windage of the bait and line on the current.
 What is a flat float. Its body is made in the form of a rounded disk, in the upper part of which an antenna is attached. From below and from above, at an angle, the float is equipped with keels, to which a fishing line is attached.
Its main advantage is low resistance, and at the same time, the float can be loaded with a weight from 0.5 g to 40 g, which gives an undeniable advantage.
The flat float is very easy to attach. With the help of silicone tubes, the fishing line is attached to the keel (you need to attach: 3 tubes - the lower keel, 1 tube - the upper one). Thus, a firm fixation of the float is carried out.
How to unload a float to flow
When choosing a float, keep in mind that a flat float should be lighter than a regular float when used in the same fishing spot.
The correct position of the float in the water depends on the weight of the float - this is known to every fisherman. But not every fisherman knows that the weight of a flat float depends on the intensity of the current.

If the load is too small, then the current presses too much on the float, and it lays down horizontally, but if there is too much load, then it deviates far forward.
When properly loaded, the float should stand for 11-12 hours.
If you follow the old-fashioned method - attach one load and that's enough, then most likely nothing will come of it. Not in this case. Do you want to know why?
When using one load, your tackle will have poor flotation, which will lead to flails. If you lift the load high above the bottom, then your bait will dangle somewhere far from the bottom, although the float itself will be in the correct position. In such cases, several weights are used.
Loading scheme for a flat float when fishing in the current

 For the main load, cut buckshot is often used, but before fixing, you need to put on a cambric on the line, on which the load will be clamped, this will extend the service life of the rig. Any fraction is suitable for support (additional weights).
Nowadays, many companies produce flat floats, but the most popular among them are: Cralusso and Colmic floats. The float's pricing policy floats between $ 4 and $ 10.
Hopefully I was able to get across the idea that the best floats for flowing are flat. With skillful use, they have no equal. And it is not surprising that at one time they made a revolution in the minds of float fishing enthusiasts.
Sorry for the money? In this case, no one bothers you to make flat floats with your own hands. And here is how to do it, we will probably write in one of the next issues.
P.S.
For those who fish with float rods not only on the current, but also wherever there is fish, I advise you to get acquainted with a small guide on choosing floats for all occasions for general development.
Well, if you are going to catch crucian carp in stagnant water, then it is better to immediately look at the article with the rules for choosing floats for crucian carp.
Today manufacturers offer to buy a lot of useful things for fishing. Thanks to unique tools and devices, fishing can be of the highest standard. In addition to preparing groundbait, bait and rigging, it will be equally important to measure the depth and learn about the features of the selected area. This can be done using a CAP marker float or any other model of this product. The tool allows you to analyze the underwater bottom topography and select the most suitable point for fishing.
What is a marker float?
Fishing floats are one of the most important pieces of equipment. With their help, the user is guided in the terrain, reacts in time to a bite. The marker product allows you to find out all the information about the bottom of the reservoir, defining each hole and the nature of the soil. It is most advisable to use this device when fishing with a feeder. So the fisherman can easily find the ideal place and make the fish bait. The feeder float is the ideal pond analysis that takes minimal time but delivers amazing results.
Most often, the product has a cylindrical shape and looks like a dart used in the game of darts. Also in the bundle is a weight (from 40 g to 140 g, depending on the current) and a coil. The fishing line, which is located on the reel, is threaded into the eye of this sinker and a float of any kind is attached (a wooden block can be used as a material). It is important that the product floats up properly and is above average in size. The final weight of the marker float depends on the selected weight, but reaches no more than 150 g.
All information about the bottom of the reservoir can be found using a marker float
Self-made marker float
It will not be superfluous for a fisherman to learn how to make a marker float himself.
A product for measuring depth can be purchased at a specialist store, or you can make a do-it-yourself float. This procedure does not require large investments and time costs.
A do-it-yourself marker float can be made in several ways. Most often, foam is used as the main material. For this, a piece of material is made as round as possible so that the resistance from the flow of water is minimal.
There is also the option of making a marker float from a syringe. To obtain an effective product, a swivel must be glued into the tip. This will create an eyelet that will aid in tying the float to the rig. Bright feathers should be attached to the back of the syringe, or simply paint over the structure with bright paint.
A homemade marker float can be made from wood or a Kinder surprise box. In the first case, it is necessary to cut a round bar, in the second, place a sinker inside. Attaching the fishing line to a plastic egg is very simple: just tie an object (bead, hook, etc.) to the fishing line and place everything in the egg, then close it. Of course, you can make a hole for the line with a hot needle, which will take a little longer but will be more practical.
 The marker float can be made by yourself
 Marker float accessories
The installation of the marker float should be started by threading the line through the eye of the sinker. It should move easily through the material without burring or damaging it. At a distance of 20 cm from the end of the line, you must fix the stopper. A bead or a rubber piece can be used as a material. This element should not move along the line, therefore, it should be well secured.
The float should be attached to the very end of the line. The result of the process depends on the quality of the fastening.
How to use a marker float correctly?
Use in still water
Before making the product, you need to figure out how to measure the depth on fishing with a marker float. You need to start the process by throwing the rig into the water. After the fisherman needs to wait until the lead reaches the bottom. The next step is to reel in the fishing line until the float stops in the eye of the weight. For convenience, marks are made about the line level at the reel itself, and the line is lowered for the float to emerge. Bleeding stops when the marker peeks out of the water. Next, a second mark is made. At the end of the procedure, it is necessary to unwind the line and measure the distance of the marks.
 Easier than ever to measure the depth of the reservoir using a marker float
 On bodies of water, using floats to help measure depth is as easy as shelling pears. Standing water practically does not give an error, and due to the absence of flow, the product ideally floats above the weight. The advantages are no bending of the line, quick ascent and minimal time spent on analyzing the depth of the reservoir.
The fisherman can purchase a unique marker float with a light sensor that will improve the fishing conditions.
Use on a current
The current is not the best way to measure depth. This is because the float sinks in one place, and floats up in a completely different place (if the water flow is strong). This gives a large margin of error. In addition, the line is deflected with a bend, which also negatively affects the accuracy of measurements.

