How to make an applique house. Color paper house appliqué
Oksana Nikulina
Goals: continue to teach children to use scissors; learn to cut strips of paper into the required number of rectangles and squares "by eye" (conditional task). Show the division of a square into two triangles by dividing diagonally to get the roof of a house. To fix the knowledge of colors (green, blue, red). Develop an eye, sense of form and composition. Raise self-reliance, confidence in their skills.
Equipment: blue and green paper strips (width 4 cm, length 15 cm, scissors, glue, brushes, napkins, oilcloth).
The teacher turns the baby chair backwards and invites the children to do the same with their chairs.
Educator:"Look, it turned out a house", sitting down in front of
a chair and looking out the back of the hole (or over the back, as if in a window. Calling the children by name, the teacher invites each of them to "look out their window."
Educator:"What a nice weather! I'll go out and call
kids play! ”. (goes to the middle of the group room and invites everyone to take a walk.
Fizkultminutka "In the sun"
In the sun, in the sun Walking in place, raising your knees high.
Meadow track
We go through the soft grass
We summer sometimes.
Chirping voiced birds, Walking, hands up.
Moths flit Walking with arms up and down.
Dandelions turn yellow,
Cornflowers turn blue.
N. Naidenova
Children continue to walk on the grass, suddenly the teacher says: “Look, the rain has started! Rather, everything is home. ” Children rush to their houses.
Educator: Where are you guys hiding?
Answers children.
Educator:That's right, in the house. And what are the houses?
Answers children.
Educator:Well done. Now listen to the poem:
Build a house
Build a house, a new house,
Heal toys in it!
Here is a brick. Here is the board.
Tiles two pieces.
There are windows in the house, doors in the house,
Walls - blocks and panels.
They took white crayons,
Whitened ceilings.
Crane leaves, important - important.
On the arrow the flag is on.
The house is multi-storey.
Come on in! The entrance is open!
Educator: Today we will turn into builders and we will build a house. What do we need for this?
Answers children.
Educator:All the items for our home, we will do it yourself.
Educator: Take a strip of blue and cut it into three parts (rectangles). Divide the green color into 5 parts. From the red square we make the roof, bending it diagonally, divided by sex into two triangles. (if necessary, assist).
Finger gymnastics.
I want to build a house
(Hands fold the house and lift above your head)
So that the window was in it,
(Fingers of both hands in a circle)
So that the house door was,
(We join hands together vertically)
Next to the pine grew.
(We raise one hand up and spread our fingers)
To stand around the fence,
The gate dog guarded,
(We join hands into a lock and make a circle in front of us)
The sun was raining
(First, raise your hands up, fingers "splayed." Then lower your fingers down, make "shaking off" movements)
And the tulip in the garden bloomed!
(We join hands together and slowly open the fingers - "tulip bud").
Educator: All items are ready. Getting to the "construction". Looking at the sample, and using the oral instructions of the educator paste the details.
Exhibition of Works Results of the lesson.
How to make an application house.
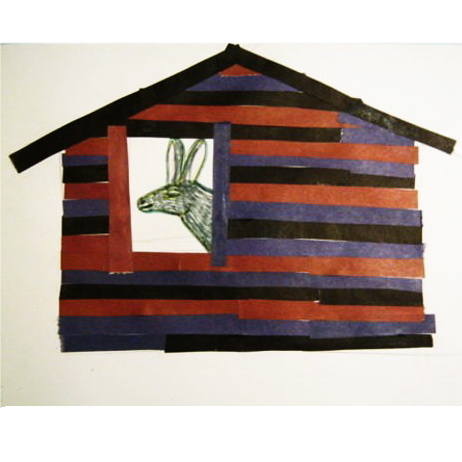
This lesson is a continuation of the previously started topic. We have already completed, cut out the silhouette and precisely glued it in the middle of the album sheet.
And today we will build a house for a donkey. This idea struck me when I re-read Winnie the Pooh. For all my life I have read this wonderful book not less than fifty times, but somehow I did not pay attention to the episode with the house of Ia before. After all, with the songs “And it is snowing, a tirlim-bom-bom ...” Winnie-the-Pooh and Piglet built the house for Ia who was freezing in winter.
Great idea!
However, it was not possible to give a lesson on the application — a house of the Zauderevo-Winnie-Pukhovsky shade - the children simply did not read this tale. About the house for Eeyh nobody heard anything.
I am not surprised - now children’s cartoons are considered to be fairy tales, and not original texts at all.
In general, then I just offered the students to build a normal, without cracks housing the size of a donkey. The drawing was done by me. That is, she approached each student and with a pencil drew a frame at home.
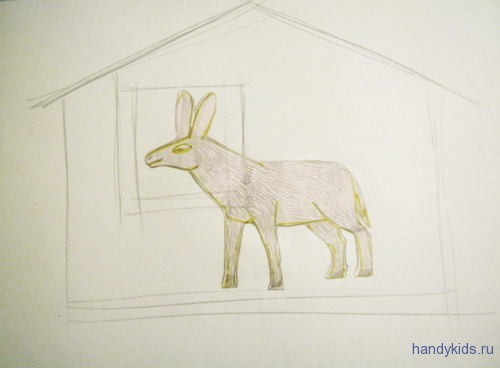
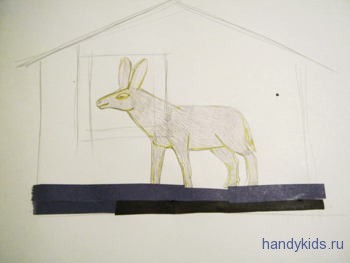
But then proceed yourself. Each received (approximately one-eighth of the album sheet) colored paper of two colors — black and brown or brown and gray, in general — I was looking for darker colors, match the hypochondriac nature of Ia.
Now we will train the skills: colored paper on even narrow strips. This case is not easy, it requires both the hardness of the hand and a good eye, so this is one of the key points of the whole lesson. And there is no hurry.

I note that making a long, smooth, straight cut is an art!
If students want to pre - the flag in their hands!
Do not want a hassle with a ruler - let them practice an even cut by eye.
When the “boards” are cut in sufficient quantity, we begin to build a house - butting and glue the stripes alternating colors.
But ... But we shall seal the donkey. It will not be visible!
Guys, but you know for yourself that the donkey is there. And besides, he will have a window. You can look to him.
Usually such arguments are quite enough, and people happily take to stick the picture, only the noise is worth. If you accidentally get a gap between the boards, then we don’t leave it that way, we need to patch a hole - stick the board on top.

The most difficult thing is to bring the house under the roof, because the size of the boards should be reduced on both sides. Well, here, be smart.
By the way! The window is not just like that - the frame must be made.
This is how a house was built for Eeyore.
 Great house, tirlim-bom-bom, I myself would willingly live in it!
How to make an application House told you.
And here is how my students, who were too lazy to cut windows, did this work.
Paper application can be a great decoration for the house where the child lives. Paper application is an affordable and fascinating work, which can be done by children and their parents. After all, do-it-yourselfers for children, and especially when a restless little helper is near, pleasant and fun. This can be a joint family hobby.
Paper applications are now in demand. And in kindergarten, and in development centers, where parents, almost from the cradle, in a hurry to give the kids, are engaged in the application. And rightly so.
After all, it is the manual manufacture of all kinds of handicrafts, applications as well as possible that affect the mental activity of the baby. A beneficial effect on its development.
Not for nothing, the directors and employees of the giants of Silicon Valley: eBay, Google, Apple, Yahoo, Hewlett-Packard send their children to school without computers. This school has a very simple old-fashioned look — blackboard with colored crayons, bookshelves with encyclopedias, wooden desks with notebooks and pencils. For training, it uses the usual, not associated with the latest technology tools: pens, pencils, sewing needles, sometimes even clay, etc. And not a single computer. Not a single screen. Their use is prohibited in classrooms and is not encouraged at home.
So we need to do so, more work with children in needlework, handicrafts, appliqués, drawing and so on. To do this, on our website, we tried to make and pick up interesting “development” for you and your children.
This publication offers you paper applique . This application is for children of 5-6 years old, primary school students who are able to freely handle scissors, glue and can easily make an application. For the manufacture of such crafts in kindergarten, for younger children, of course, need the help of adults.
Paper application house how to make.
You only need to download and print the application templates, cut and paste on the background image. The background can be any you wish.
Good luck and interesting discoveries to you and your kids!
Application paper house for children
Application paper house for children

Crafts made by children - the best decor for the room. Application "House" can be a picture, a cover for a notebook or a gift to a grandmother.
Use of crafts
Creativity for the child is an important element of its development. Crafts connect imagination, fine motor skills, learn to use scissors and glue. In emotional terms, the development of creative children is much better.
Parents in these moments will be able to establish contact with their child and will pleasantly spend time behind the process. 
Colored paper house
Crafts for the child should be simple and easy. The app will help your child learn colors and geometric shapes. If the child does not know how to use scissors, parents should help him. To begin, we will prepare materials for creativity:
- white and color paper;
- pencil;
- scissors;
- glue.
Get to work in a good mood! So, how to make a house:
- On a white sheet draw the contours of the house. Draw the roof, window, door. Nearby you can "plant" a tree.
- From colored paper with scissors cut out shapes that fit the shape. The roof is a triangle, the base of the house is square. Imagine with the children.
- Then glue the workpiece along the contours of the picture. We give applications to dry.
- We finish the necessary elements with a pencil.
Winter crafts
Application in the younger group of the kindergarten is characterized by ease of implementation and availability of materials. Children must cut out the parts themselves and stick them. For crafts in the form of need:
- white and color paper;
- cotton wool;
- scissors;
- glue;
- sparkles and rhinestones as desired.
Manufacturing process:
- Take a white sheet and draw a schematic picture.
- We begin to cut out in turn from colored paper the roof of the house, the base, the crown and tree trunks, the sun and clouds.
- Glue all the elements and give them time to dry.
- Then we make snow. The first method: cut a lot of white pieces and paste them randomly on the trees, the roof of the house. Second: divide the cotton wool into small pieces, roll the balls and glue them.
- At will we decorate spangles, it is possible to make asterisks from strazynok.
The application "House" is made very simple. Showing imagination, you can make a series of pictures on the seasons. 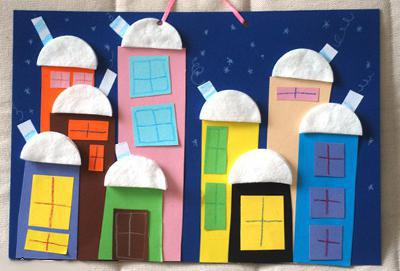
Felt house
Baby is done quickly and easily. Felt is a very soft material with a rich color range. To make the application "Color House" neat, let's prepare the following:
- felt of various shades;
- scissors;
- glue;
- cardboard;
- any decorative items.
How to make such a house with the children? The process is very simple:
- Cardboard will be the basis for the picture. For little children, you can draw the outlines of the house with a pencil.
- From felt we cut out geometric shapes - squares, triangles, rectangles. They will become details for the "construction" of the house.
- Each element is glued with glue. Older children can sew felt to the cardboard with threads.
- We decorate at will a picture with clouds, sunshine.
Any crafts aimed at the development of children. Application is the easiest and most understandable way for kids to learn how to use scissors and glue. 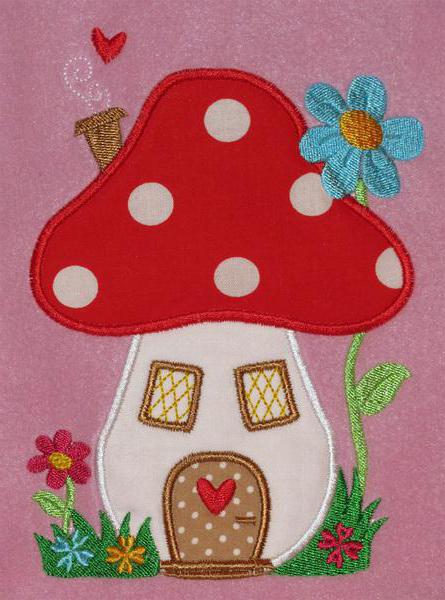
House in the forest
Crafts should be varied. Application in the younger group - It is an integral part of the educational process. At any time of year you can make a house in the forest. For its manufacture prepare the following materials:
- color paper;
- white cardboard;
- scissors;
- pencil;
- glue;
- various additional materials, such as pieces of fabric, threads, buttons.
The application "House" is made very simple:
- On white cardboard in simple pencil draw a house, sun, trees, clouds.
- We select the paper colors we like and cut out the details for the application.
- Glue all the elements to the picture.
- We make rays of suns from threads, from red buttons - apples on a tree, pieces of cloth can become grass.
Each such craft will be different individuality. In the process, the child will be able to learn colors, geometric shapes, fruits and berries, seasons.
Materials for children's creativity
Products for children should be of high quality and safe. The most popular materials for babies:
- Color paper. It has an extensive color range, a fairly low price and is suitable not only for applications.
- Felt - very soft material. The rainbow of shades makes it ideal for children's handicrafts.
- Buttons develop fine motor skills, help to study geometric shapes.
- Threads, yarn, ribbons. These materials at hand can complement any children's application, make it alive.
- Corrugated paper is suitable for sticking individual elements, and for creating flowers and trees.
- Glue is an important element in children's creativity.
- Pencils, paints, felt-tip pens will help to complement the drawings and make them brighter.
The application "House" - for children a good opportunity to develop in creative terms. It is quite simple, easy to do. Even the children of the kindergarten group will cope with the manufacture of the house. Older kids can complement their pictures with more complex elements and additional drawings.
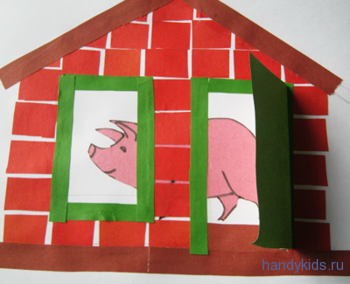
Colored Paper Applique - Brick House
On the dwelling we have already done a lot of applications from colored paper. And designed, and, from the branches erected. It is time to build a solid stone house. Mansion of bricks.
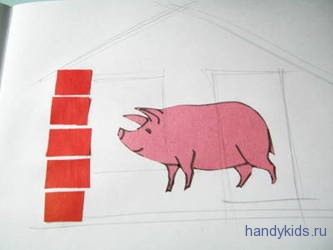
I was inspired by a fairy tale about three pigs. This is the house that my Nuf-Nuf built.
Well, okay, I built for Nuf-Nuf while I was preparing for a lesson on this topic. Now I will tell you step by step with explanations.
Coloring "pig" I have a whole herd. I cut out the most well-intentioned in appearance and stick it approximately in the center of the album sheet. Now I need bricks. And you need the development of fine motor skills of the hands and the eye. So we will try to get both ours and yours well.
I will make bricks from paper strips.
![]()
Recently, all applications are somehow connected with cutting paper into strips, and my students have already learned a great deal - they quickly and accurately cut paper tapes, and we will cut them into identical rectangles. The eye viewer is also already trained - the children maintain the size of the bricks by eye quite qualitatively.
For my piglet I drew the house project with a simple pencil and now I will lay out the walls.
Difficult moment is a triangular gable roof.

That is, we need to make the roof level, not stepped.
I noticed that no one of the first-graders realized that the “bricks” could be cut diagonally and insert these triangles, but if I were told, they would immediately think.
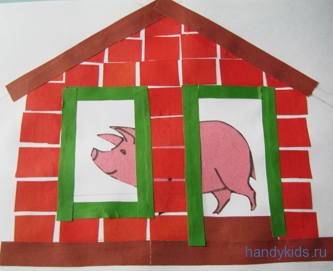
So, let's not forget to roof - the slopes of the roof extend beyond the wall, so that in the rain the water does not flow from the roof directly onto the wall. Paste the window frame and the door jamb from narrow strips of paper. The door itself can be made opening — it is glued by the bend — children like very much that the pig looks out of the window and the continuation in the next frame is visible in the doorway.
Application House of bricks