DIY siding decoration step by step instructions. DIY siding installation: technology How to install siding
One of the currently popular materials for exterior home decoration is siding. It is inexpensive and has excellent qualities. It is easy to install and reliable in operation.
The instruction on how to install siding is a universal guide.

Various types of siding are mounted on a pre-prepared crate.

The choice of material for the crate
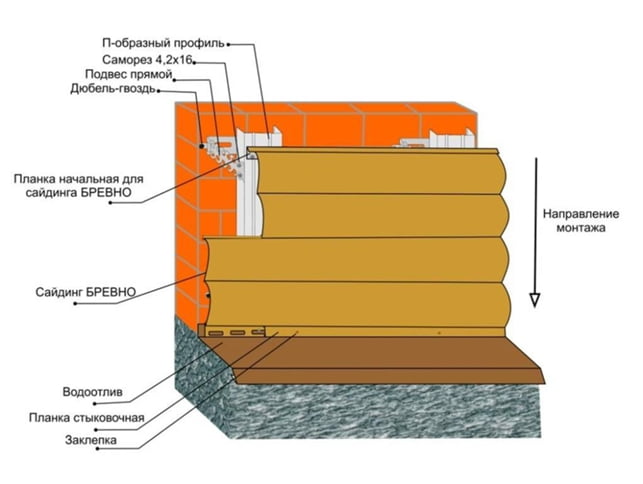
The frame can be assembled from wooden bars or metal profiles. The second is more preferable because it has greater reliability and durability. Also, metal products are much easier to attach to uneven walls.

The profiles are attached to the wall in half a meter increments. For this, special suspensions are used. Thus, differences in height and unevenness can be avoided by choosing the crate according to the level.
A wooden frame will be cheaper, but you should pay attention to the condition of the material:
- The wood should not exfoliate;
- The timber must be flat and not deformed;
- There should be no signs of rot or stains on the tree.

In addition, it is necessary to ensure that the material is treated with an antiseptic. This will avoid exposure to moisture and microorganisms.

If the walls of the house are wooden, they also need to be processed.

Foundation preparation
Before you do the installation of siding with your own hands, you need to prepare the basis for the frame with your own hands. Since after sheathing there will be no access to the outer wall, it must be cleaned of debris, peeling elements, and so on.

If there are any defects, they need to be eliminated with putty. The wall should be more or less even. Also, it is necessary to remove all unnecessary elements, such as tiles, platbands, bars and gutters.

Installing the guides
The most common method of attaching siding is horizontal. This means that the crate will need to be fastened vertically.

If the guides are mounted to a wooden house, then nails or self-tapping screws are used, if the wall is made of a concrete block or brick, then you need to use dowels, the holes for which must be pre-drilled in the wall.
Each rail must be leveled.

Installation of the first panel
It is better to start installing siding for a private house from the less visible side of the house, so that you can navigate and practice working with a specific material.

We install the panel in the lock connection and in the corner profile;

We attach the panel to the frame; It is necessary to observe the indents during installation. If the work is carried out in warm weather, the gap between the material and the fasteners should be about 5 mm. If we work in the cold, then about 10 mm.

Note!

It is not necessary to nail the siding too much, because under the influence of temperatures it will expand and contract, while a tight fastening can deform it.

It is also important to hammer in the nails correctly when sheathing siding. This must be done at right angles and exactly in the center of the hole. It is usually recommended to drive nails at a distance of up to 40 cm from each other.

Also, during installation, you need to ensure that the panels are not stretched, otherwise they may change shape and incorrectly connect to each other.

To make the siding look like in the photo - beautiful and even, you need to know and apply some subtleties that will help to cope with some of the difficulties during installation.

Fastening is made strictly from left to right, from bottom to top.

Note!

The panels are arranged horizontally and vice versa if the lathing is horizontal.

We monitor the gaps when attaching the material. This is especially important for vinyl and metal siding. They are most susceptible to temperature effects.

We fix the siding only with the factory holes. This primarily applies to vinyl panels. If you hammer a nail right into them, the service life will be sharply reduced, they will be more susceptible to destruction.

When installing wooden siding, it is necessary to use galvanized products, this will help to avoid early damage to the material.

The cladding of a log house is carried out no earlier than half a year after the completion of construction. The tree should shrink. If this rule is not followed, all siding will simply lead.

Note!

Separately, it is worth mentioning the installation of basement siding. A material different from the whole house is chosen for it, since it serves as a frame.

The frame for it is performed in the same way. As a rule, the basement space is left without insulation, so that the walls can better ventilate and "breathe".

DIY siding installation photo


Due to the availability, ease of installation and aesthetics, siding is gaining popularity and becoming worthy competitor other types of facade decoration.
is he not subject decay, not afraid of moisture and temperature changes, does not warp, does not require painting, easy to clean.
Siding types:
- Polymer siding made of polyvinyl chloride and acrylic plastics. Non-rotting, non-flaking, non-flammable and non-toxic. It is distinguished by its low price and ease of installation.
- Metal siding more often used for finishing industrial and commercial premises, less often for residential construction. It is a galvanized steel profiled sheet coated with a polymer composition. It is fire resistant, strong, durable, corrosion resistant. The term of use is 30-50 years. Requires careful processing of attachment points and cutting areas to avoid corrosion.
- Fiber cement siding made of cement with the addition of cellulose fibers. Does not burn, does not rot, environmentally friendly. Does not deform and is not affected by temperature extremes. It has higher soundproofing properties than plastic and metal types. Fastened with self-tapping screws or shaped metal plates. Demanding on the quality of installation - errors can lead to a decrease in strength and resistance to moisture.
Vinyl siding installation technology
Vinyl siding can be used even by beginners without much experience construction work. The material is flexible and during installation there is a very low probability of damage and injury.
Installation will require:
- tape measure and building (preferably laser) level;
- electric jigsaw or siding knife;
- drill or hammer drill;
- screwdriver.
Important:it is permissible to use a grinder for cutting siding, but since at high speeds the cut can heat up and deform, you need to monitor the use of the tool only at low speeds.
Before installation it is necessary to remove climbing plants, drainpipes, fasteners, lights, ebb - all elements that interfere with the installation of panels from the sheathed surface.
With horizontal siding, the lathing is installed vertically in 40 cm increments, with vertical installation it is done horizontally. When installing constantly need to check level using a building level, plumb line or rule.
Simultaneously with the installation of the lathing the wall is insulated - the space between the bars is filled with heat-insulating material. The thickness should be equal to the thickness of the bars.
Vinyl siding installation rules
Basic rules for installing vinyl siding:
- It is nailed in such a way that there are no obstacles to its changes under temperature extremes. To take into account its expansion-contraction, leave 5-6 mm between the end edge of the siding strip and the J-strips.
- If the installation takes place at temperatures below 0 ° C (installation is permissible up to a temperature of -10 ° C), the gap must be increased to 9-10mm.
- It is not necessary to fasten the panels too tightly to the surface. When hammering in nails, leave a gap of 1-1.5 mm between the nail head and the bar.
- Screws and nails are driven strictly at right angles and only in the middle of the fastener hole, observing a step of 30-40 cm. After sheathing the entire surface, the panels should move freely within the fastening holes.
- Each panel needs to be connected to the bottom panel and pushed upward, snapping the lock, then nailed. Too tight and too loose fastening should be avoided.
- When installing platbands, shutters, wiring, holes are drilled with a margin of about 5 mm in diameter for thermal changes of the panels during temperature fluctuations.
Panel mounting
 To install the starter bar find the lowest point of the surface to be sheathed, using a building level, apply chalk markings. The starting strip is installed with the upper edge along the marking line.
External corner is provided for closing the end edges at the corners of the house and mates the planking of perpendicular surfaces.
If necessary, the inner and outer corners can be joined by cutting off the side portions of the top edge at 2.5 cm, leaving the central portion. Next corner panel overlaps with a gap of about 0.5 cm.
Connecting H-strips They are installed in the middle of walls to highlight openings, on blank walls of a large area, at the junctions with annexes. In their locations, an additional profile in the crate is required.
Being vertical elements, they are installed in the same way as corner strips - the first fasteners are mounted in the upper part of the upper hole, the rest are strictly in the middle. The openings are finished using J-bars.
Finish panel installed flush with the eaves at the top of the wall. The cut of the top last panel snaps into the groove of the finish strip.
Installation of spotlights and cornice boards
For installation of spotlights and cornice boardsit is necessary:
- In the middle of the eaves overhang, an additional lathing strip is mounted for the subsequent installation of fasteners.
- Soffits are installed prior to the installation of the last siding strip. The elements in which they will be installed are mounted parallel to each other. One receiving profile is installed on the eaves, the other is mounted on the wall at the required height using a level.
- To install the soffit in the receiving elements, you need to measure the distance between them along the inside and cut off the panel 6-8 mm less than this size.
- Bring the soffit into the receiving element on the wall, then into the element installed on the eaves.
- Connect soffits on the corners of the roof at angles of 45º and 90º.
- When installing spotlights on eaves, it is more convenient to use fillets (eaves moldings) to install the last siding panel. Since they are not attached to the wall, but to the eaves, they can be anchored at the distance required to engage the siding panels.
 Cornice moldings can also be placed over a siding facade. On the last siding bar, additional holes are made with a puncher.
If necessary, a wooden leveling strip is mounted under the siding panel. The fillet is mounted on top of the siding panel and covers the mounting holes.
Horizontal panel mounting
In addition to the usual requirements for this type of installation the rules are followed:
- installation starts from the corner or from the door; fasteners - from the middle to the edges;
- the last mount is mounted 10-15 cm from the end of the bar;
- it is impossible to install horizontal strips inside the vertical elements until they stop;
- you need to check the level of each row of panels.
Installation of planks on walls adjacent to the roof
It is more correct to install here siding without overlapusing solid panels. In the case when it is impossible to do without an overlap, it is made "from the roof" so that the snow easily slides off without clogging the cracks.
If roofing iron is used as waterproofing, when installing the receiving profile, it must be push back 2-2.5 cm from tin sheets heated in the sun.
 Ordinary stripes metal siding is installed in a similar manner to vinyl siding. The subsequent rows of planks are installed on the previous rows until the lock clicks with an interference fit.
If necessary, the lower part of the plank can be knocked up. For fastening metal siding, galvanized self-tapping screws with a seal... They are matched to the color of the front side of the slats.
Unlike vinyl siding, additional metal elements can be ordered in the required configurations with the only limitation in length. Siding is popular as a finishing material, also due to its ease of maintenance.
To maintain its good appearance, it is enough to periodically wash it with warm water with the addition of detergents. Can not use while bleaching and powders with abrasive particles. When washing with a hose, the jet should be directed from top to bottom.
With a little effort and strictly adhering to the installation guidelines, you can save at the work of builders and achieve excellent results.
Instructional film about vinyl siding installation technology, watch the video:
You can improve the appearance of a house or any other extension by installing siding, moreover, it perfectly protects the walls from precipitation and wind blowing. This facade material is also used for cladding industrial buildings.
Siding is a practical and popular building cladding material. It is produced in the form of panels from 3 to 4 meters long, each of which has a latch-lock and an edge with holes for fasteners. Siding has good performance and aesthetic appearance. Of the positive qualities, it can be noted:
- makes the appearance of the building more beautiful and neat;
- thanks to the large selection of panels, the house can be given an individual style;
- high-quality siding has a service life of more than 30 years;
- installation can be done independently;
- is a safe material;
- when dirty it can be easily cleaned with water and detergent.
Low-quality and cheap siding burns out under the influence of the sun after 2 years, since a small amount of titanium dioxide is added to it during production.
Finishing panels are available in a variety of textures, and come in a wide range of colors. Siding is produced in several types:
- Metal;
- Vinyl;
- Basement (fiber cement);
- Acrylic;
- Wooden.
Let's take a closer look at each type:
- Vinyl siding is made of polyvinyl chloride and in appearance can copy finishing materials from stone, wood and brick. The panels are lightweight and resistant to mold and decay. The material is non-toxic and not damaged by pests. Vinyl products do not conduct electricity and are inexpensive, but not resistant to mechanical stress.
- Acrylic siding is a new finishing material and is almost the same as vinyl siding. At the same time, it is very durable, has a more resistant coating to the effects of ultraviolet rays. The panels have a long service life and do not deform from high temperatures. It is also resistant to aggressive substances and non-flammable. Acrylic siding has one drawback - high cost.

- Metal siding comes in steel, aluminum and galvanized steel. This material is strong, durable and environmentally friendly. The panels do not change their original shape when the temperature drops and are resistant to oil and chemicals. Mold cannot grow on its surface and pests do not eat it. Metal siding has several disadvantages. Rust will form on the panel when the protective coating peels off. There is a lot of noise when it rains. Metal siding is more expensive than vinyl siding.

- Wooden siding or facade clapboard is the most environmentally friendly material and has excellent thermal insulation performance. It is produced from coniferous and larch wood species. To prevent the panels from darkening and cracking, a protective coating is applied to them. The price of the material depends on the type and type of wood.

- Fiber cement panels are made from high quality cement, cellulose fibers and sand. The outer side of the slab has a special coating that protects against moisture and sunlight. The material is non-flammable, and it also does not rot or grow mold. Fiber cement siding is resistant to mechanical damage and deformation. Does not contain harmful substances and is environmentally friendly. The service life is 25-50 years, depending on the manufacturer and external conditions.

Installation of battens with waterproofing and insulation
Before installing the siding, you need to make a reliable frame. The lathing can be made of wooden beams or metal profiles. It is fixed to the walls with brackets. The racks of the lathing are fixed in the opposite direction of the siding, that is, if the panels are mounted horizontally, then the lathing is made vertically, and vice versa. The distance between the elements in the structure depends on the weight of the siding - the heavier the material, the more often the racks are attached.
Step-by-step instructions for making the lathing:
- The surface of the walls is prepared, drains and all protruding parts are removed.
- If necessary, the walls are primed, wooden surfaces are treated with an antiseptic.
- Using a level and a plumb line, places are outlined for attaching the suspensions. They are placed every 40 cm, they recede from the edges of the walls by 15 cm, from the inner corner - 10 cm.
- Drill holes, insert dowels and mount U-shaped brackets.
- Bars are fastened along the edges of the wall, a rope is pulled between them.
- The rest of the vertical beams are mounted.
- Horizontal metal profiles are installed with a step of 40 cm.
- Above the plinth, above and below the windows and doors, using the “crab” connector, the horizontal elements of the crate are fixed.
- Mineral insulation is laid between the racks and under the crate; an overlap is applied at the joints. Attached to the wall with umbrella dowels.
- Mineral wool and crate are covered with wind and vapor barrier insulation. The edges of the film are stacked on top of each other and glued with construction tape. It is fixed to the crate with double-sided tape and counter-rails.

You can insulate the walls immediately after installing the U-shaped brackets. The heat-insulating material is put on the suspensions and fixed with umbrella-type dowels, after which it is covered with waterproofing, and the crate is mounted for installing the siding.
For regions with a warm climate, thermal insulation is not done, and for cold zones, the thickness of the insulation should be at least 15 cm.
Installation of the starter bar
Before installing the starting plate, ebb tides are installed. They are fixed with self-tapping screws with a distance of 40 cm between them. When joining, the ebb tides are placed on top of each other. The width of the overlap is at least 2.5 cm. A building level is used to indicate an even angle.
The starting or starting bar refers to the load bearing elements. Installed from the top edge of the ebb or at the very bottom of the wall. The first siding sheet is being installed on it. The initial bar is fixed by checking the level, since the evenness of the entire wall cladding depends on its installation.

Installation of the starter bar:
- from the lower border of the future sheathing retreat upward by 4 cm;
- using a level, they make marks on all vertical racks of the crate or make marks on the wall if there is no frame;
- the initial plank is set with the upper edge to the marks;
- fixed with self-tapping screws in the middle of the factory holes;
- the starting strips are attached so that the distance between them is 0.5 cm (this gap is necessary for thermal expansion);
- the same distance should be from the edges of the corner elements or the width of the corner profile plus 12 cm.
What is the J-profile for?
- The J-profile is a versatile, load-bearing siding trim element. It can be regular, arched (flexible) and wide.
- A regular J-profile is required at the end of a cladding row at the end of a wall, for sheathing the edge of a cornice or for replacing a finish panel.
- Wide is usually used to decorate door and window openings.
- Arched is used along the edge of an arch-shaped opening. The panel has notches where cuts are made at the required distance, so that it can be bent at the desired angle.
- J-profiles are fixed to the walls with nails or self-tapping screws.

How to fix the siding
Fastening of siding is done on the facade of the building or on the lathing. Fastening methods depend on the type of facing material:
- Vinyl panels should only be fastened to the factory holes.
- It is recommended to use galvanized fasteners for wood cladding.
- The fastening of the elements should be done straight and straight, in the center of the factory hole.
- Fastening the siding to each other, press it from the bottom up so that the top panel snaps into the lower lock.
- When installing the slats, you need to leave a gap of 2 mm between them and the lathing to expand the cladding during temperature changes.

Installation of internal and external corner strips
Corner panels are load bearing elements. Attached after the starting profile. Designed to close and secure the edges of siding, also serve as guides.
Installation of corner strips:
- mount the panel so that its lower part protrudes 0.5-0.7 mm above the starting strip, and the upper edge does not reach the cornice by 5-7 mm;
- begin to fix the profile from top to bottom;
- the first self-tapping screw is screwed into the upper part of the factory hole, the rest of the fasteners are located in the middle of the holes;
- the distance between the screws is 20 cm;
- to lengthen the corners, the holes for fastenings are cut off at the top profile to a length of 34 mm so that the strips overlap each other by 25 mm, and the remaining 9 mm are left for a gap;
- if the starting strips are located close to the corner, then at the corner profile the edges of the nail fasteners are cut to the height of the starting strip;
- internal and external corner strips are installed using a plumb line and level.

How to lengthen siding strips
When the siding is shorter than the length of the sheathing wall, a connecting strip is installed to lengthen the panels horizontally. The connecting profile closes the joints of the siding, which makes it more durable, protects against precipitation under the cladding. In addition, this way the appearance of the facade will look more beautiful and look like one whole.
You can also lengthen siding panels using the "overlap" method. The profile sheets should be staggered, avoiding butt joints at the same level in a row. The overlap length of one panel on another must be at least 5 cm, with the obligatory coincidence of the factory holes for fasteners.
Installation of H-profile
H-profile refers to additional load-bearing elements. Used to join two horizontal cladding panels when the wall is longer than the cladding material. It is also used when connecting soffit (cornice) siding.
Fastening the connecting strip starts from the top of the wall The first fasteners are made at the top of the hole, the subsequent screws are screwed in the middle of the holes. The H-profile from the cornice should recede by 0.5 cm, and be 6 mm below the starting bar. On both sides, the connecting profile has an offset of 0.6 cm from the starting panels, that is, it is located between them.
During installation, the siding is not inserted into the H-profile until it stops, but so that a gap of 5-6 mm remains for thermal expansion.

Installation of ordinary siding panels
For an even and neat finishing of the facade of the building, it is necessary to use a level whose length must be at least 80 cm.
The end side of the first siding panel is inserted into the corner strip, and the lower part is inserted into the initial bend-lock and snapped into place. After that, if necessary, pull it up to level the horizontal row. Twisting the fasteners on the panel is done from the center to the edges. Leave 5 mm between adjacent strips for thermal expansion.
The fasteners must not be screwed in completely. A gap of 1-2 mm is left from the screw head to the panel. It is impossible to pull the profile up after the lock connection on the starting plate snaps into place.
The subsequent rows of panels are installed in the same way - one side of the siding is placed in the corner groove, and the other in the H-profile or in the opposite corner. The installed panel is snapped into the lock of the previous one and screwed to the crate.
Facade cladding with siding is mounted to the top of the wall, but so that there is room for the installation of the finishing strip and the last profile.

Laying the finishing siding strip
A finishing strip is a decorative element that is used to beautifully and sealed the top edge of the last panel. Install with the factory mounting holes facing down and the panel lock facing up.
Finishing strip installation procedure:
- the plank is mounted with screws at the very top of the wall, under the cornice;
- the distance from the top of the finishing strip to the installed panels is measured, and 0.3 cm is subtracted from the result; if the width of the profile sheet is greater than the distance, then the upper part is cut off from it;
- at the cut off panel (without the upper part), holes are made every 10 cm with perforating pliers;
- at the prepared strip, the lower part is inserted into the lock of the previous profile, and the upper part is inserted into the lock mount of the finish panel and snapped into place.
Fasteners are screwed on the finishing strip through 3-5 holes and in their center.

How to get around windows and doorways with siding
Before siding, the openings of windows and doors are trimmed with special additional elements (platbands). Along the perimeter of the inner side of the window (door), the slats are fixed to which the finishing profile is screwed.
At the upper and lower near-window strips, the edges from the inner side are incised by 2 cm, and bent in the form of "tongues". The upper and lower platbands are inserted into the groove of the finishing one, then fixed with screws to the crate. When installing side window strips, "tongues" are wound inward.
If the siding panel does not fit in width under the window or above the window (or door), it is shortened to the required depth along the width of the opening. In place of the cut, holes are made for fasteners, which should be the same size as the factory ones. Then the siding panel is slipped under the window element and fixed. An ebb is installed below the window opening, the upper edge of which rises from the window along its entire length. The width of the window sill should be 5 cm larger than the opening.
Above the window (door), the profile is mounted in the same way. For wall cladding on the side of the openings, the panels are cut to the required length. Then they are brought under the platbands.
When the wall cladding is made with highly embossed siding, for example, a block house, then the installation of window slats is done after the panels are installed.

Gable trim
At the final stage, they start facing the pediment. If the attic will be used as a living space, then the pediment is insulated.
First, the roof overhangs and the end part of the roof are prepared. Remove old cladding, ebb and wind boards. The roof material is cut so that it is flush with the front overhangs. The lathing for the siding of the pediment is made in the same order as on the walls.
Installation of siding on the pediment:
- if the wall of the house and the pediment are separated by the cornice, then ebb planks are mounted;
- along the perimeter of the pediment, J-strips are fixed or from below the starting one, and from above - the finishing one;
- corners are made of metal profiles and external corners are installed;
- since the shape of the pediment has an angular slope, a siding trim is used as a template to apply cutting lines to it;
- the connection of the panels is made with an overlap or using an H-strip;
- the top is a ridge siding sheet, fixed from above directly through the panel, it is better to drill a hole in advance.
The cornice is finished with a special facing material - soffit. For the installation of the panels, the edges of the cornice are sheathed from the inside with slats. J-bars are attached to them. Soffit siding is flexible enough, so it is easy to install with a slight downward bend and fit into the grooves of the J-strip. A click is heard when the panel is inserted correctly. The distance between them is 0.2-0.3 cm for thermal expansion. The cladding of the building is completed by the installation of roofing strips - drip planks. Placed on the outside of the slopes.
You can do the installation of siding with your own hands. The main thing is to strictly follow the manufacturer's instructions and follow all recommendations. Buying building material should be done in one batch at once, so that it is enough to finish all the walls, plus 5-10% more than the calculated amount (for fitting). Additional elements are purchased from the same manufacturer.
How to install siding yourself with the least loss.
Installation of siding generally does not cause any particular difficulties, but it requires strict adherence to the technology of installing siding and the recommendations given by the manufacturer regarding the installation of this finishing material.
Renovating an old and dilapidated building is a rather complicated and time-consuming process, especially when it comes to a wooden house with a long service life. There are two main ways to solve this problem:
- Cover the house with clapboard. Doesn't solve all problems. It will require constant maintenance of the facade: annual repainting, sealing of loose joints, etc.
- Finishing with siding. This option is more acceptable, since it allows you to perform work quickly, at the same time insulate the building, and also retains a good appearance for a long time without the need for seasonal maintenance.
Attention! Siding belongs to the category of ventilated facades, so wooden walls will not rot under it, while continuing to "breathe » .
The choice of siding as a finishing material in this case is obvious. It should be noted that this type of exterior decoration can also be used for brick and concrete houses, as it allows you to quickly and easily carry out repair work and give the building a beautiful appearance.
Before carrying out the main work, you need to decide which ones will suit you.
You can see a photo of examples of house cladding with siding with your own hands. There are many successful examples.
It remains to answer the following few questions:
- How to calculate the required amount of consumables?
- Is preparatory work necessary?
- What tool do you need?
- What can surface preparation for siding include?
- How to make a crate?
- How to start, continue and finish installation work?
- What should be considered when?
- How can hardware help? Etc.
In the instructions for installing siding, we will try to answer all these questions in order.
Siding calculation
 Most owners who carry out repairs with their own hands make a gross mistake when calculating by squaring the walls of a building. What's the catch? The fact is that the strips are made in a standard length, it is just under six meters. Then it must be docked. As a result of the calculation by quadrature, many segments remain and often there is simply not enough material. Therefore, it is necessary to calculate the total amount of material in order to avoid overspending as much as possible, taking into account the length and width of the bar.
- We measure the length of the wall. For example, it has 8 meters. Consequently, a whole strip can be installed, and then another section of about 2 meters. In the future, the remnants of the cut strip will be additionally used for the other two rows. It turns out that only four strips are needed for three rows.
- We measure the height of the wall. The walls in a wooden one-story house are usually no more than 3 meters to the roof. One row of siding has a working surface of 22.9 cm. Three rows, therefore, will cover 0.68 m. Then we divide the height of the walls by the result obtained and by four 3000 cm ÷ 0. 68 ÷ 4 \u003d 11. It turns out that for a blank wall it is necessary purchase 11 strips of material
- Window openings. Do not throw away the area of \u200b\u200bwindow openings, as additional material will be needed that can be used for slopes. Additionally, it will be necessary to calculate the total number of J corners, docking strips, starting strips. They are calculated in strict accordance with the length and height of the building.
If you have difficulty in calculating, you can use a special calculator, a program that is often found on various construction sites.
Preparation for construction work
 At this stage, it will be necessary to assemble a construction tool, install scaffolding, and most importantly, decide whether the work will be carried out independently or with the involvement of a professional team. If the latter option is chosen, then it is easy to calculate the additional costs. The cost of the brigade's services will cost 50-75% of the cost of building material. If there is no opportunity or desire to spend such an amount, then you can perform the installation yourself. When negotiating with the construction team, you need to take into account that all the problems associated with the calculation, preparation and installation will be solved by the workers of this team.
You can calculate yourself, think about where you can save, and where to add elements based on your financial capabilities.
You can get acquainted with the dimensions of the siding. And you can find a detailed description of the features of calculating siding at home.
What kind of siding installation tool might you need?
To clad a building with siding, you need a standard set of tools. Namely:
- Angle grinder
- Screwdriver and screwdriver
- Hacksaw for metal
- Level
- Roulette
- Puncher
- A hammer
- Metal scissors
If possible, you can also use a circular saw, it helps to accurately cut the required angle and increase the quality of work.
Is it necessary to prepare the surface?
 For a wooden house, this is an obligatory part of the installation. For a brick building, in general, preparatory work is not required. A wooden house is prepared as follows:
- The surface is examined in order to remove rotten boards
- The surface is treated with an antiseptic
- All decorative and protruding elements are removed
It is important enough to check the windows in the house in order to determine their compliance with the horizontal and vertical planes. Any unevenness will be clearly visible, so you may need to trim them or replace them with plastic ones. After completing the preparatory work, you can proceed to the arrangement of the lathing.
How to install profiles for siding (make a crate) and insulate the walls?
 Is it necessary to install siding battens? In short, yes! The fact is that the lathing is a kind of shock absorber between the walls of the building and the material itself. During the shrinkage of the building, cracking or deformation of the strips can be avoided. In addition, the lathing eliminates the unevenness of the walls. So, she is needed! In addition, it can be used to insulate the walls of the building. How is the installation of the battens carried out?
- Two profiles are installed along the edges of the building. They are set in strict accordance with the vertical and horizontal level. By the way, a standard profile is usually used for installation, which is used for plasterboard structures.
- The rest of the profiles are installed vertically along the thread. The optimal distance between them is about 40 cm.Some, wanting to save money, take a step wider, up to 60 cm.This can be justified if there are no strong gusts of wind in the area where the building is located
- Insulation is placed between the profile. For ventilated facades, it is best to use one of the soft thermal insulation options
- Checking the end result using a rule
Now you can start siding.
Installing vinyl siding
Where to begin?
Installing the starting strip
 First you need to do the markup.
Moreover, the requirement here is that the lower part of the plank does not lie on the ground. The gap between it and the blind area of \u200b\u200bthe building should be at least a few centimeters. The strip is fastened using galvanized nails.
It is better to install the starting siding strip immediately around the entire perimeter of the building. This is where the level comes in handy. With its help, we mark out zero, and with the help of a construction cord, we establish a common horizon for the four sides. Since there is already insulation on the walls, marks can be made directly on the profile.
Installing fittings and strips
 The installation process is quite easy, but you should still follow the basic recommendations:
- Vinyl siding expands under the influence of temperature; during installation, this property of the material must be taken into account. The required thermal gap is about 5-6 mm.
- The material is attached to the crate so that it can "breathe". The nails are not driven to the end, leaving a small gap between the head and the facing material of about 1-2 mm.
- The fastening is carried out in the center of the hole. Fixing the bar from the side is a violation of the technological process. The step between the fasteners is about 30-40 cm.
- It is necessary to fix the strip only after the panel is snapped into the lock. This will be indicated by a click
The corners must be protected with special fittings. Are there rules in this regard?
 The outer corner helps to increase the strength of the finish and at the same time hide the place where the planks join together. Installation recommendations for this hardware are as follows:
- Bottom part. Should protrude 10 mm lower than the lower level of the plank
- Top. Should not reach 5 mm to the cornice.
- Fastening. In this case, the step between the dowels should be less, a spacing of 20-30 cm is allowed.
- Additional fittings. If you need to close the end part, you can cut out the plugs yourself from the segments from the J - strip
How to install the J bar?
 In order to refine the door and window openings, it is necessary to install the so-called J-bar. It will be much easier to do this with a circular saw at hand.
- A groove is cut in the horizontal strip on both sides. In vertical, a special eyelet is made
- A plank is installed along the perimeter of the window, the upper part of which is cut at an angle
For deep slopes a double-sided J-profile can be used.
[сaution] Siding strips should be mounted from top to bottom. It is quite important to leave certain gaps during installation between the end of the strip and the connecting profiles and corners. The siding panels should be free-standing to create space for thermal expansion of the material.
 If the length of the strip is not enough and you have to build it up, you can use the following tips:
- Install H profile. Best but expensive solution
- Install the planks butt-to-end. In this case, the docking points must be done at a run
Otherwise, the installation of siding is not difficult.
Some private home owners prefer to use metal siding for cladding their home. just like vinyl, it is uncomplicated.
Helpful hints:
- It is best to use a circular saw for cutting corners. It can be rented at any construction supermarket.
- Arched J - profile must be fixed without an expansion joint. Dowel caps only in this case are hammered close
Finishing with siding allows you to restore an old house quickly and efficiently with the possibility of additional insulation and, most importantly, independently. All this is possible only if you listen to the recommendations regarding its installation.
DIY siding installation video
Video instruction from a large Russian manufacturer of vinyl and basement siding.
The main and obvious advantage is the simplicity of siding installation, having the necessary set of tools, everyone can do the siding installation with their own hands, even a person who does not have professional training and experience.
As with all finishing materials, siding will expand or shrink from heat exposure, for this reason, tension on the panels should be avoided, and not tightly nailed onto the crate. Usually, a 2 or 3 mm gap is sufficient.
When overlaying panels, take care to maintain a gap of 6-9 mm for thermal expansion. When installing in frosty conditions, the clearance should be approximately 12 mm.
Siding can be cut at temperatures above -10 °. Otherwise, it is better to cut in a heated room.
It is better to fasten the siding using galvanized short self-tapping screws with a rounded head that do not have a drill. The use of roofing nails is also possible. Another important point of installation is that the siding should be fastened exclusively in the center, and not from the edges.
With uneven walls, a lathing is required. If you run the cladding without lathing, then the entire curvature of the walls will be reflected on the siding. But, even with ideal walls, lathing can be performed - this will provide ventilation of the facade, which will have a good effect on the operational characteristics of the building.
Siding lathing is made of wood or metal
Each has pluses and minuses. Metal lathing has a slightly higher cost, albeit slightly. Wooden lathing must necessarily be processed using a special compound. For horizontal siding, vertical sheathing is performed, and vice versa.
If you use a special tool to install the siding, the work will be done faster and better. In addition, you will have to work:

Siding Basics
Below is a plan of work that will need to be done to cover the house with siding:
Preparatory work
The first step is to dismantle all protruding parts: doors, platbands, grilles, etc. Next, you should seal all the cracks with polyurethane foam or cement mortar.
You should also clean the walls from all kinds of dirt. A house made of wood must be treated with an antiseptic and antipyretic, foam concrete walls are treated with a primer.
Work on the installation of the lathing
Since the siding is not attached to the walls, the lathing should be installed. To do this, use a metal profile or wooden slats. For walls made of concrete and brick, a galvanized profile is used.
You can use the CD-profile for drywall. When facing a frame or wooden house, you can use 60 x 40 mm wooden slats with a residual moisture content of 15-20%. Before using the rails, they should be treated with an antiseptic. Using a tape measure and a level, make a straight line marking of the walls, until a closed contour is obtained.

Now, at the corners, the distance from the marking to the foundation is measured, after which another contour is drawn at the minimum value. The next stage is the installation of vertical guides. They need to fit snugly against the walls to achieve this, you can use pieces of wood or dense foam. The guides should be located at a distance of 30-40 cm from each other.

In places of additional load, for example, at corners and next to windows, you will need to add guides. There should be no joints between the vertical guides. This is done to provide ventilation that prevents fungal growth.
Thermal and moisture insulation
Waterproofing must be done, as opposed to insulation.

For this, a moisture-windproof membrane is used. If thermal insulation is performed, the lathing must be done in two layers.
Installation of guide elements
Installation begins with drainage. It is rigid and easy to attach. Then, with the help of self-tapping screws, the corner profiles are fixed. The next stage is the fastening of the starting bar to the drainage along the marking. Along the perimeter of the windows, window strips or J-profiles are fastened so that the location of the outer bottom edge is slightly lower than the inner one.

The doorway is edged with J-profiles. When H-profiles are installed vertically in previously specified places, use the level. Here it is required to leave a gap of 5-6 mm to the foundation in order to avoid bending of the planks over time. The top edge of the siding is closed with a finishing strip.
Panel installation works
After installing all the guiding elements, you can start installing the panels. The first row is attached to the starting bar.

Fastening of all other panels is carried out in the same way, up to the window, or roof. The panels should not be overtightened or tightly fixed, they should wiggle a little on the sides. The finishing of the top row of siding is carried out using a finishing strip.
Siding can be connected along the length using a special H-rail. When using it, the panels are installed in the H-rail, and you do not have to deal with the so-called "runaway" - i.e. control that the location of the joints is not along one vertical line.
 It goes without saying that the H-rails will be visible from the outside of the building, which can negatively affect the design. This problem can be solved simply - either H-slats are selected according to the color of the siding, or the siding is mounted "overlapping". As already mentioned, such a happy finish requires a "run-off", so that the seam line is not so noticeable. Usually, they try to direct the visible part of the joints to the side from which they look at the house less often.
This helps to improve the visual perception of the building. Do not forget that using H-rails, you lose in terms of economy, due to the larger amount of trimmings. Of course, all this is relevant only if the siding bar is shorter than the length of the wall.
Don't cut the siding beforehand. Pruning is more convenient during the installation process.
Video: DIY siding installation instructions for dummies
Many people cannot decide how to improve the appearance of their home. For this reason, this material describes how to decorate your home using the best material for a job such as cladding installation - siding. Video instruction is attached.
There is nothing difficult during the installation of siding, you just need to watch the video, and lay everything exactly as described there. But before watching, it is worth reading a step-by-step explanation of this process:
1. Surface preparation.
Warming
Place insulation boards on the wall surface.
The space between the laths should not be completely covered with insulation, there should be at least a minimum distance for ventilation.
Siding fastening (installation is carried out from bottom to top!)
Determine the bottom level of the siding plates.
Mark the bottom level with twine or chalk.
Mount the first row of planks along the marking line.
Install external or internal corners.
Install finishing strips on window and door openings.
How to calculate home siding
You decided to sheathe the house with siding, but that was the question - how to calculate the siding for the house? It's very simple! Since siding is a finishing material with clear geometric dimensions and a specific purpose, its quantity can be calculated up to 1 m².

To begin with, in the calculation process you will have to use the following items:
- tape measure - to take initial measurements;
- with a leaf and a pencil - for sketching sketches;
- calculator - for calculations.
The amount of siding for the cladding of the building is calculated in stages. The first step is to calculate how many siding panels are required, and at the second stage of calculations, the required additional elements are calculated.
Before doing the calculations, you should determine the exact value of the area to be clad. To complete these steps, you should start drawing up a schematic drawing of the building, which you will later measure.

An important point: if a building that needs to be faced with complex geometry, then in your schematic drawing, in addition to dimensions, the placement of panels should also be indicated.
This way, you create the groundwork for proper use of the material, and reduce the likelihood of encountering unplanned waste and lack of siding.
The following formula will help you in calculations:
Sр \u003d Sst - Sо
where, Sр - calculated area, Sst - wall area, Sо - area of \u200b\u200bwindows and doors.
Now, we calculate the siding, taking into account the material that will not be used, according to the following formula:
where Sс - siding area, and% - unused material.
The amount of waste is taken equal to 7-10% in the case of covering rectangular walls. And from 10 to 15% in the event that trapezoidal walls are sheathed, or the walls have a large number of protrusions, recesses, etc. The more complex the configuration of the building, the more waste is obtained.
The next step is dividing the resulting area Sc by the usable area that one siding strip has. For example, a strip of siding has a total area of \u200b\u200b0.89 m2, then its usable area is approximately 0.777 m2.
By the way, sellers most often use the mathematical approach for calculation, due to the fact that their responsibilities include selling as much material as possible.
In order to avoid possible inaccuracies, it would be appropriate to draw up a plan that will accurately paint the detailed location of each strip of siding on a particular wall. If you use sketches, the calculation will be more accurate and you will get a visual installation diagram.
For this calculation method, the following formula is used:
where N is the total number of panels, Sп is the usable area of \u200b\u200bone panel, H is the height of the building.
Removing shutters, grilles, drainpipes and other fixtures from the surface on which the siding will be mounted.
Installation of siding battens. When using wooden slats, they should be impregnated with an antiseptic, since they have a moisture content of no more than 15-18%. Vertical slats are mounted at a fixed interval of 30-40 cm.
House cladding siding photo
In this material, you are presented with examples of how a house is clad with siding - a photo of buildings, the external decoration of which is made using classic vinyl siding, wood-like siding and facade panels. If you are choosing a finishing material for your home, then here you will find a lot of information for yourself!