Do-it-yourself wooden case for a flash drive. How to make an unusual USB flash drive from wood - step by step instructions Homemade cases for flash drives
USB drives have become a part of our life. With their help, you can transfer information from one computer to another, view images and videos on TVs. The flash drive is compact, durable and lightweight. But most manufacturers offer boring oblong cases that differ only in size and color. Although, the appearance of this gadget is a real field for creativity.
This collection contains original ideas for USB flash drive enclosures that you can implement with your own hands.

Instructions for a homemade USB enclosure
Many are interested in the question of what the body can be made of at home. For these purposes, a small wooden block, a Lego "brick", a keyboard button, a spent lighter or a small children's toy will do.


The shell of a flash card made of amber epoxy glue looks unusual, into which you can brick a small object or insect. Lovers of polymer clay can mold the body of any shape. And if there are empty cartridges in the household, then you get a real military gadget.

And although the material at hand can always be found at home, some consumables will still have to be purchased.

We are purchasing
When the issue with the drive shell is resolved, it's time to check the availability of the necessary materials and tools. The minimum set that we need:
- old flash drive for parsing, for example Transcend JetFlash 2 GB;
- sharp knife;
- pliers;
- thermal gun with a minimum power of 20 W and rods to it.

On the Internet you can find photos of homemade flash drives with LEDs. Then, in addition, it is worth preparing an LED light bulb, a 300 Ohm resistor, a soldering iron and a screwdriver.


We disassemble an old USB flash drive
The first step is to disassemble the old device and remove the board. For collapsible structures, it is worth prying with a sharp knife with a thin blade the seam along the body, separating the two halves from each other.

If your old device was in a molded case, then we do the same - we open the latch located near the USB connector with a sharp object.

Preparing a new building
For clarity, we will show how to make a case for a USB flash drive from a children's toy. To do this, divide it with a knife into 2 parts, one of which will be a lid. Hollow rubber or plastic blanks do not require any rework.

Another thing is toys with “stuffing” of stiffeners or jumpers. With pliers, we break out everything unnecessary inside, simultaneously cutting off the sharp edges with a knife. A cavity should be formed inside the workpiece, sufficient for the installation of the flash card and the LED.


In order for the latter to glow during connection, through holes with a diameter of 2-3 mm are drilled in the toy body with a screwdriver.

We solder the LED
We take an LED and visually determine its plus pole by the smallest electrode area. Using a soldering iron, we connect this terminal to a resistor. We install heat shrink tubes on the ends and begin to solder the contacts to the USB flash drive board according to the following scheme:
“+” Of the LED (the place where the resistor is soldered) is connected to the rightmost leg of the board;
“-” is soldered to the leftmost leg.

Putting together a USB flash drive
The last stage of updating and repairing a flash drive with your own hands is installing and fixing the board in the toy body. We insert a flash card with an LED into the toy and fill the cavity with glue using a heat gun.


Irregularities, excess adhesive can be cleaned with a clerical knife, and burrs or sharp edges can be dulled with sandpaper.

In order for the improvised cover, the second part of the toy, to close faster, you can attach a small magnet inside it.

Checking a new device
After assembly, you need to check the drive for operability. If everything was done correctly, when connected to a PC, the LED backlight will work and the card will be ready for use. But if something went wrong, then you shouldn't be upset. It is enough to know the main malfunctions of flash drives and how to fix them. All failures are classified into mechanical or physical, electrical and software errors.


Mechanical damage
Most often they are the result of user negligence. A flash card used without a protective cap is prone to static, the USB connector may bend. Therefore, keep portable assistants only closed or in special cases.


It is not uncommon for a drive to be stepped on or dropped from a height. In this case, the USB legs or the contacts on the board responsible for power supply may be unsoldered.

The defect can be eliminated by soldering the extreme contacts of the plug. If after that the flash drive comes to life and starts blinking, but still does not work, then the probable reason is the departure of the data transfer pins. The same soldering iron will come to the rescue.

Electrical faults
The most common culprit for electrical damage is water trapped inside the flash drive. Such a device is not recognized on the computer. The flooded device must be thoroughly cleaned of salt and dirt deposits, immersed in isopropyl alcohol and dried thoroughly before use.

Other causes of electrical breakdowns include soldering defects, static discharges, overheating due to poor heat dissipation in the case, and power surges. Here you will have to resort to hardware recovery - replace non-working parts, re-solder defective spots.


Software (logic) faults
These include damage invisible to the eye - failures of firmware or firmware. To fix them, you can use special utilities or formatting the drive. Periodically check the system of the flash card for errors, use only safe removal from the ports and do not pull out the device during its operation.

Do-it-yourself photo of flash drives


Flash drives often break and, as a rule, the outer shell - the case - fails. How to reanimate a drive so that it will serve you for a long time to come? Read on how to make a case for a USB flash drive with your own hands: step by step instructions.
Today we will look at a few questions:
- how to properly disassemble flash drives of different designs;
- what tools will be needed for this;
- how to make a case for a flash drive.
In addition, we will tell you what materials at hand can be used to create a new case, and which are better not to use, so as not to damage the carrier. At the end there will be small master classes on the design of this device in the form of a Lego cube and a lighter.
Flash drives are an integral part of modern life. Of course, there are various other types of storage media. Computers and laptops have long appeared in everyday life, after all, some even use their smartphones for this. But despite this, these media do not lose their relevance: they can store large amounts of information, quickly and easily connect to various devices, do not take up much space. They are used to store photos, videos, films, music, and for many, it is an irreplaceable thing at work, for transferring reports, presentations and important documents.
Usually they are in a plastic "body", sometimes in a silicone - manufacturers like to make these types in funny forms like fruits, cartoon characters and TV series. And much less often they are more impressive, for example, steel. Plastic media are easily damaged, they can crack from an unexpected fall, bend at a fracture, crack, being under a heavy object.
What is the way out of this situation? To spend money on buying a new device, time on transferring information? Why, if you can just read this article and find out how to create your own original case for a flash drive. In the possible options, you are limited only by the availability of materials and your imagination, the methods and types of home-made cases can be different: from a Lego cube or a piece of a bar left over after repair, and ending with an ordinary cork. Some craftsmen create real works of art in various styles and even sell them. Since there are many options, we will consider the basic principles - how to properly remove a flash drive from the old "body" and how not to damage it, what tools you may need and what items can be used to create a new design, and what materials should not be used.

Removing the flash drive
So, let's begin! First, just in case, transfer all your content to another device. A flash drive is:
- whole;
- collapsible.
While the former have a visible slit in the body, the latter look monolithic. But both of them can be easily disassembled, the main thing is to know how.
Let's start with the "solid" type. Its connector is connected by a latch to the board, and this latch snaps into place, and it is impossible to disconnect it in the usual way. We'll need a thin, flat pen screwdriver. Using this tool, we make a hole between the body and the retainer. Carefully, so as not to damage anything, lightly press, swing up and down. Such holes must be made in three or four places where the connection goes, now we can easily remove it.

Now how to remove the case from the "collapsible" flash drive. Such a drive is much simpler and requires less effort to disassemble: there is a small slot along the case, making it easier to work. We also need a thin pen screwdriver. Unlike the monolithic type, there is no latch, but there are latches that we need to open. We insert the screwdriver into the groove and use the same rocking method to open the case. The latches may break, but this will not do any harm to the drive.
Making a case for a flash drive
Well, we have disassembled the flash drive, and now we turn to the main task - how to make a case for the flash drive? Your self-made version, as mentioned earlier, can have any form - the main thing is to preserve the functionality of the drive. Firstly, the item should be easy to connect to the computer, and secondly, the materials should not damage its components.
That is, the protruding edges should not interfere with the connection with the USB port, since an incompletely inserted one may not work, and it is also necessary to avoid collisions of components with hot glue, paint and other aggressive materials. The new case must be sealed and not allow moisture to enter the board. The easiest way is to choose plastic. It is much more difficult to create a shell made of wood or metal, but it will definitely last a long time and will retain its "presentation".

One of the housing options - made of electrical tape
We make the body of a flash drive from a lighter
We will consider the simplest option, made from a regular lighter. Almost everyone has an old used lighter lying around somewhere at home, and sometimes they have an interesting design. We need a clerical knife, a glue gun, a lighter of a suitable size, a screwdriver with a 3 mm drill. A lighter is suitable so that a flash drive without a case fits completely into it and only the USB port protrudes. Any glue suitable for plastics can be used.
First you need to release the remaining gas from the lighter, then make two holes in the bottom. Next, we make a cut with a knife along the contour framed by holes. We install the USB flash drive inside and glue it to the case, remove the remnants of the glue. Our new drive enclosure is ready. We now have an interesting and practical flash drive-lighter. As you can see, it is not difficult at all and does not take much time.

Flash drive - Lego cube
Another way to design a USB flash drive in an original way is to make it in the form of a Lego cube, which almost everyone has. We'll need some Lego bricks, a penknife, pliers, glue suitable for plastics, polish and sandpaper. First, we select cubes suitable in size for our flash drive. You can create a case from several cubes of different sizes and colors. With a penknife we cut off all the internal partitions, now we break them out with pliers. We use the second same cube for the lid, cutting everything off to the top. At the end we cut a hole for the USB connector, adjust, install the device.

Using the remnants of the brick, we fix the USB flash drive so that it lies parallel. We fill in the empty space, for this you can use transparent silicone. So that there is no gap between the base part and the lid, we rub the joint with sandpaper, glue it. After the glue has dried, remove the remnants using sandpaper. With the help of polish, we finish the work.

Your exclusive do-it-yourself flash drive is ready!
So, as you may have noticed, making a case for a flash drive is not that difficult. The main advantage of making it yourself is that it will be truly original. After all, before proceeding with its implementation, you turn on your imagination, choose materials from the available and more accessible to you, collect them together and as a result you have an original and individual flash drive that will not go unnoticed 100%. She will certainly emphasize your individuality and creativity.
Fpeshka is a modern and highly symbolic gift that everyone will appreciate. But the plastic cases of USB-drives do not look very presentable. If you want to make your gift pleasant not only from the point of view of the attention you have given, but also aesthetically effective, work hard and make a wooden case for a flash drive with your own hands.
Materials (edit)
To make a wooden case for a USB drive with your own hands, prepare:
- the flash drive itself;
- a block of wood of any species;
- joiner's glue;
- linseed oil or wood stain;
- hot glue;
- milling machine or hand tools for woodworking;
- saw;
- grinder;
- sandpaper.
Step 1... Cut a piece 6 - 7 mm thick from the block you have. The section parameters in this case were 55 x 55 mm.
Step 2... After cutting off the block, grind it thoroughly for further work.
Step 3... Considering the parameters of the plastic case of the flash drive you have chosen, sketch its prototype on paper. Attach it to the cut piece of wood, and then start making a groove for the internal filling of the flash drive. The depth of each groove should be 2.4 mm.
Step 4... Cut a part of the bar with grooves into two parts of the flash drive body. Sand them.
Step 5... Disassemble the plastic case of the flash drive, leaving only the inner part and the port.
Step 6... Place the USB stick schematic into one of the blank wooden case. Secure it in place in the correct position with a drop of hot glue.
Step 7... Lubricate the halves of the wooden case with wood glue. Clamp it and place it in a vice. Remove excess glue immediately.
It always looks bright and unusual, especially if it is a USB stick in a wooden case. However, this will take a lot of time and effort, but believe me - the result will be worth it. In order to make an original flash with your own hands, you will need: three planks, a sharp knife, a cutter, drills for wood and metal, a file, a file, epoxy resin and super glue.
Homemade case for a USB stick made of wood with your own hands
First you need to cut out three planks, which will be larger than the board from the flash drive. One plank should be made of wood that is different from the other two varieties - this will give the craft an interesting and stylish look.

In the end, this is how your three blanks should look.
Now you need to make a hole in the central plate, into which you should fix the flash card. The hole should fit very well and the edges can be coated with super glue.

Now you need to make a hard layer so that the flash drive does not break with significant physical exertion. For example, it often happens that flash drives simply break out of their plastic cases, then what can we say about a wooden one.


For this, a ruble coin is perfect, which must be carefully cleaned with sandpaper. (Almost polish). Then, using epoxy resin, we glue the metal blank to the wooden case. In advance, of course, we make a hole in the coin with a drill and a file into which the USB connector will pass.

You should have such a "rough" flash drive, with which you still have to work a lot. Similarly, following the instructions above, you should complete the cover for your author's craft. Please note that after all the operations carried out, the craft still does not look stylish.

In order for the author's flash drive to become truly "marketable", the workpiece must be carefully processed with a file. After that, the surface can be varnished (or you can leave the natural wooden coating intact). Agree that such a craft will be a truly original accessory. I bet that you will not find such a flash drive from anyone.
Greetings to all beginners and experienced life hackers of this site!
We have an ezine where we write various interesting articles about useful gadgets and unusual concepts. We also look into the future or make the present more interesting, more beautiful and more useful. Read the next ezine article.
Almost everyone has a USB flash drive today. But with all the variety, the range of cases for such devices is rather limited. Why not make a case for the flash drive yourself? It is not as difficult as it seems, you just need to spend quite a bit of time. But you will become the owner of a unique gizmo.
So let's get started! Following the step-by-step instructions, we will make a case for our USB flash drive using Lego bricks.
 This is how it will look
Tools and materials
Penknife
Pliers
Multiple Lego Bricks
Super glue
Sandpaper
Metal polish
Flash drive
Step 1. chassis base
 Internal elements are broken
USB memory cards come in a variety of sizes. We will be packaging a fairly large board. Therefore, we need a Lego brick with a size of 6 × 3 cylindrical landing elements (let's agree to call them "points").
Using a pocket knife, you need to cut all the inner partitions of the brick, and then break them off with pliers.
We will use two more low-profile bricks with dimensions 4 × 2 and 2 × 2 “dots” to create the cover. Also, for the cover you will need a low-profile element 1 × 6 "points" (for the cover, you can use other combinations of designer parts, or you can simply take exactly the same brick as for the base of the body (6 × 3) and carefully cut off its upper part with a jigsaw parallel to the horizontal plane).
Using superglue, glue the lid elements together to form a 6 × 3 “dots” piece.
Step 2. Installing the board
 PCB in the case
At the end of the case we cut out a groove for the USB connector, and after a slight adjustment with the help of a penknife, we install the device into the case.
Step 3. Securing the board
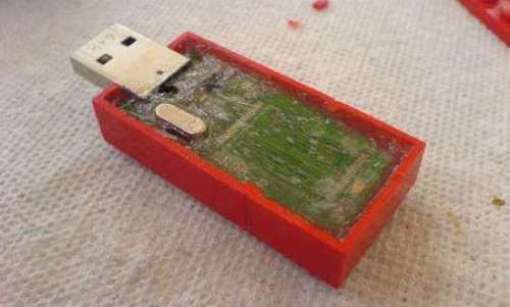 Fill the body with silicone
We put brick scraps on the bottom of the case and make sure that the board is parallel to the horizontal plane and does not push through. We fill all the remaining space in the case with transparent silicone, sealing it to reduce the possibility of any movement of the flash card inside the case.
It is important to use transparent silicone, since the indicator LED will have to shine through it.
Step 4. Bonding and polishing
 Cleaning the edges
 Polishes of different abrasiveness
So that there are no gaps between the lid and the body, we take sandpaper, put it on a flat surface, and align the lower plane of the lid on it.
After we superglue the lid to the case, we use the same sandpaper to remove burrs and glue stains from the side edges of the case.
Then we finally polish the case with a polish.
Step 5. Completion
 The case is ready
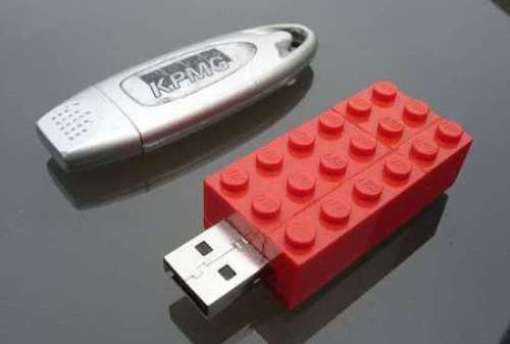 Compare your exclusive and mass consumer goods
 Looks stylish!
But this is not the end of the creative possibilities for creating exclusive flash drives. On the contrary, there can be an infinite variety of types of cases for them.
See what other craftsmen have done.

Do you have an original designed USB stick? What ways to customize this mini-media do you know?
In the meantime, there are still some unread curiosities in the mini-journal: a visionary video about the medicine of the future; gadgets - a landline cell phone and a bottle for a tourist to disinfect water. and don't miss anything!

